Anatomy of a Transformation Gem
Together let's deconstruct a commonly used Transformation, the Aggregate Gem. Follow along in the HelloWorld_SQL Project.
Using the Gem
- Open the HelloWorld_SQL Project.
- From the list of Models, select the Orders Model. A Model is a series of transformation steps (Gems) that describe how to create a single table or view. The Orders Model defines the steps to create the Orders table.
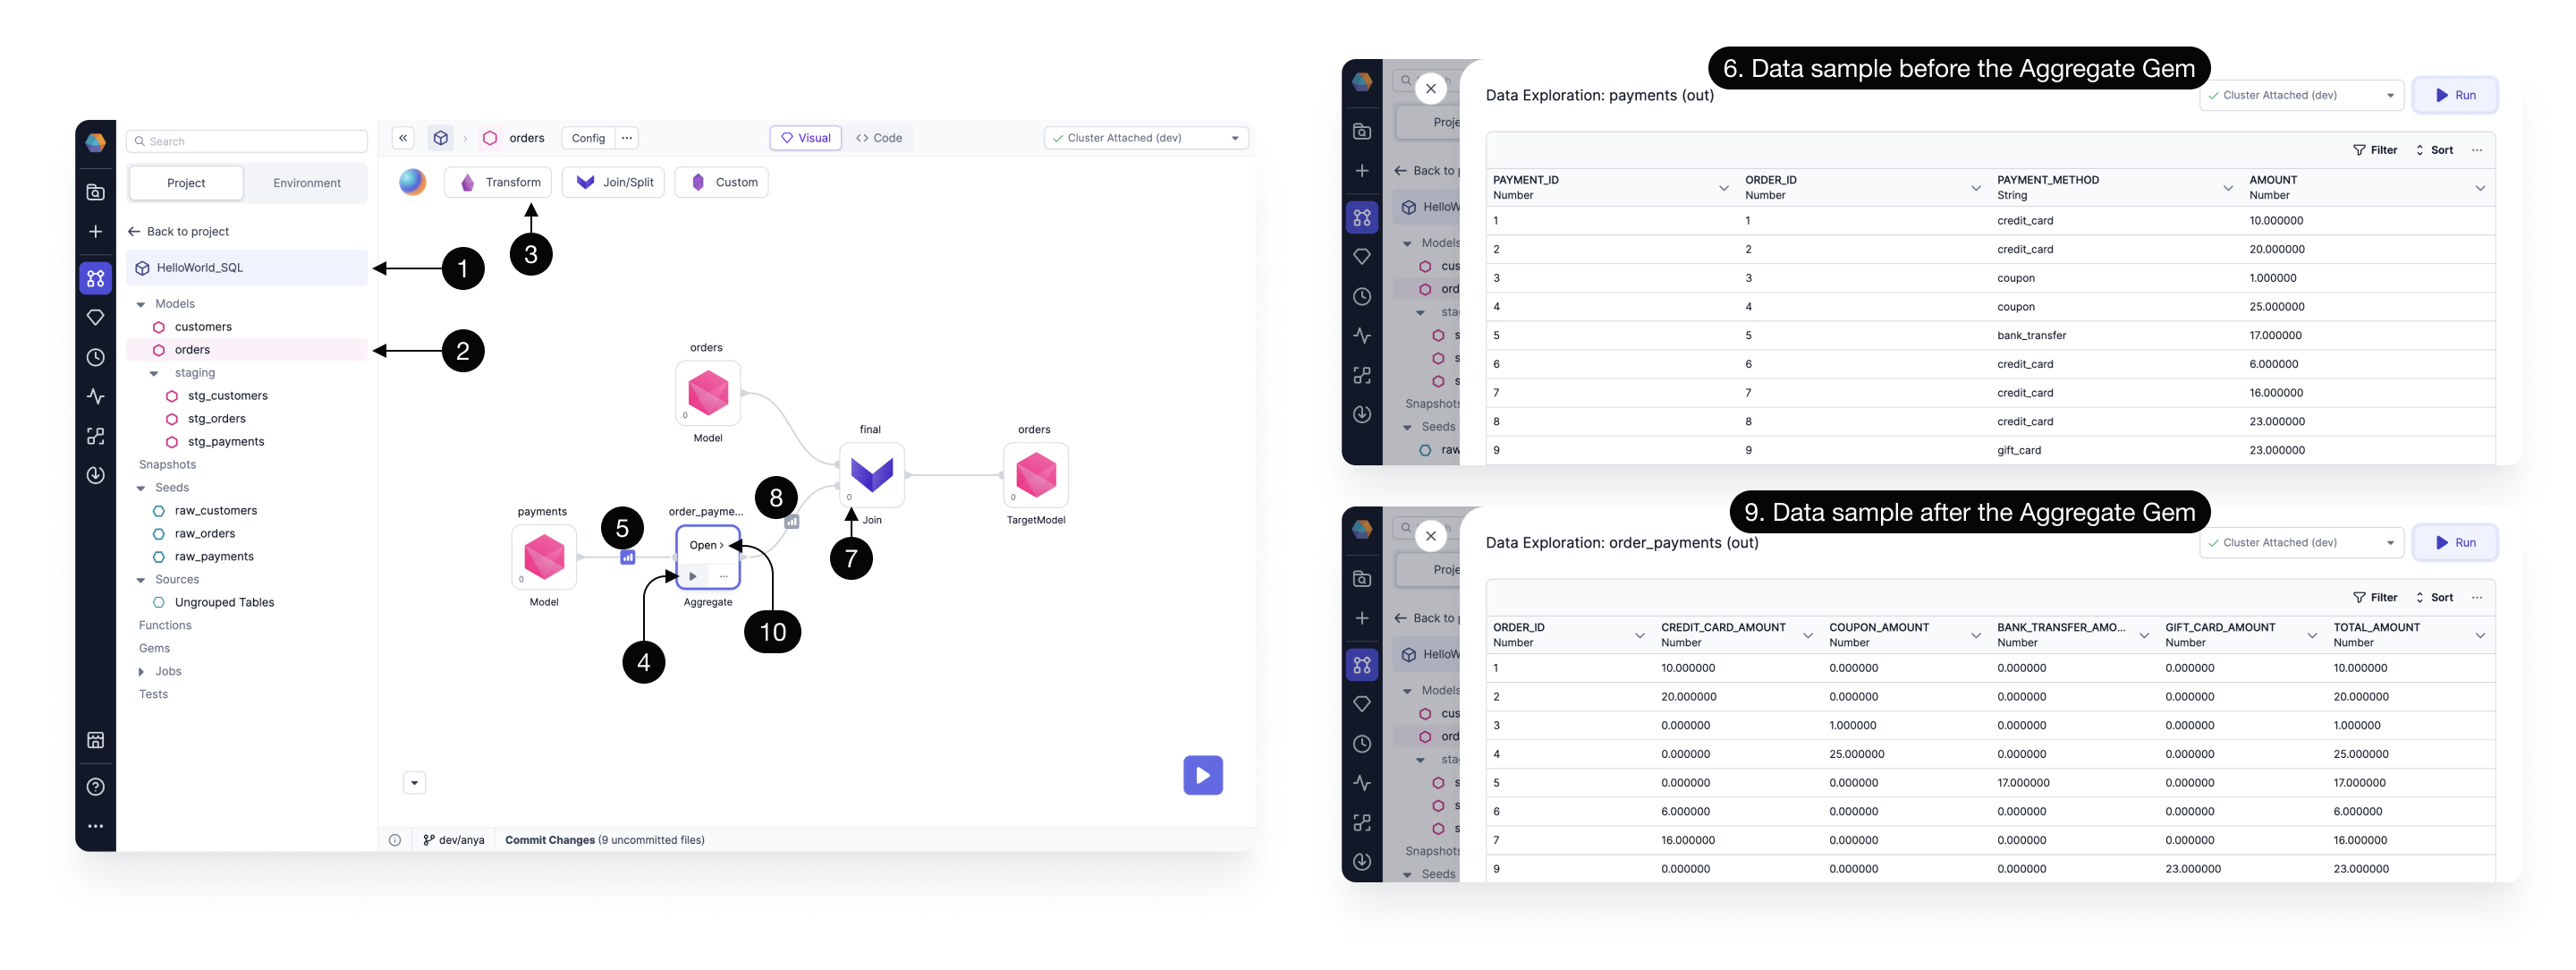
- Open the Transformation dropdown to see the available Transformation Gems. The Aggregate Gem has already been dragged to the canvas and configured in this HelloWorld_SQL example.
- Click the arrow to Run upto the Aggregate Gem.
- Preview a data sample before the Aggregate Gem.
- This is the
paymentsdata sample before the Aggregate Gem. There is one row per payment. - Click to Run upto the Join Gem.
- Preview a data sample after the Aggregate Gem.
- This is the
order_paymentsdata sample after the Aggregate Gem. The individual rows ofpaymentshave been grouped according toORDER_ID, and the amounts have been summed according to the payment type. - Let's see how to use expressions. Click to Open.
Using Expressions
GroupBy expression
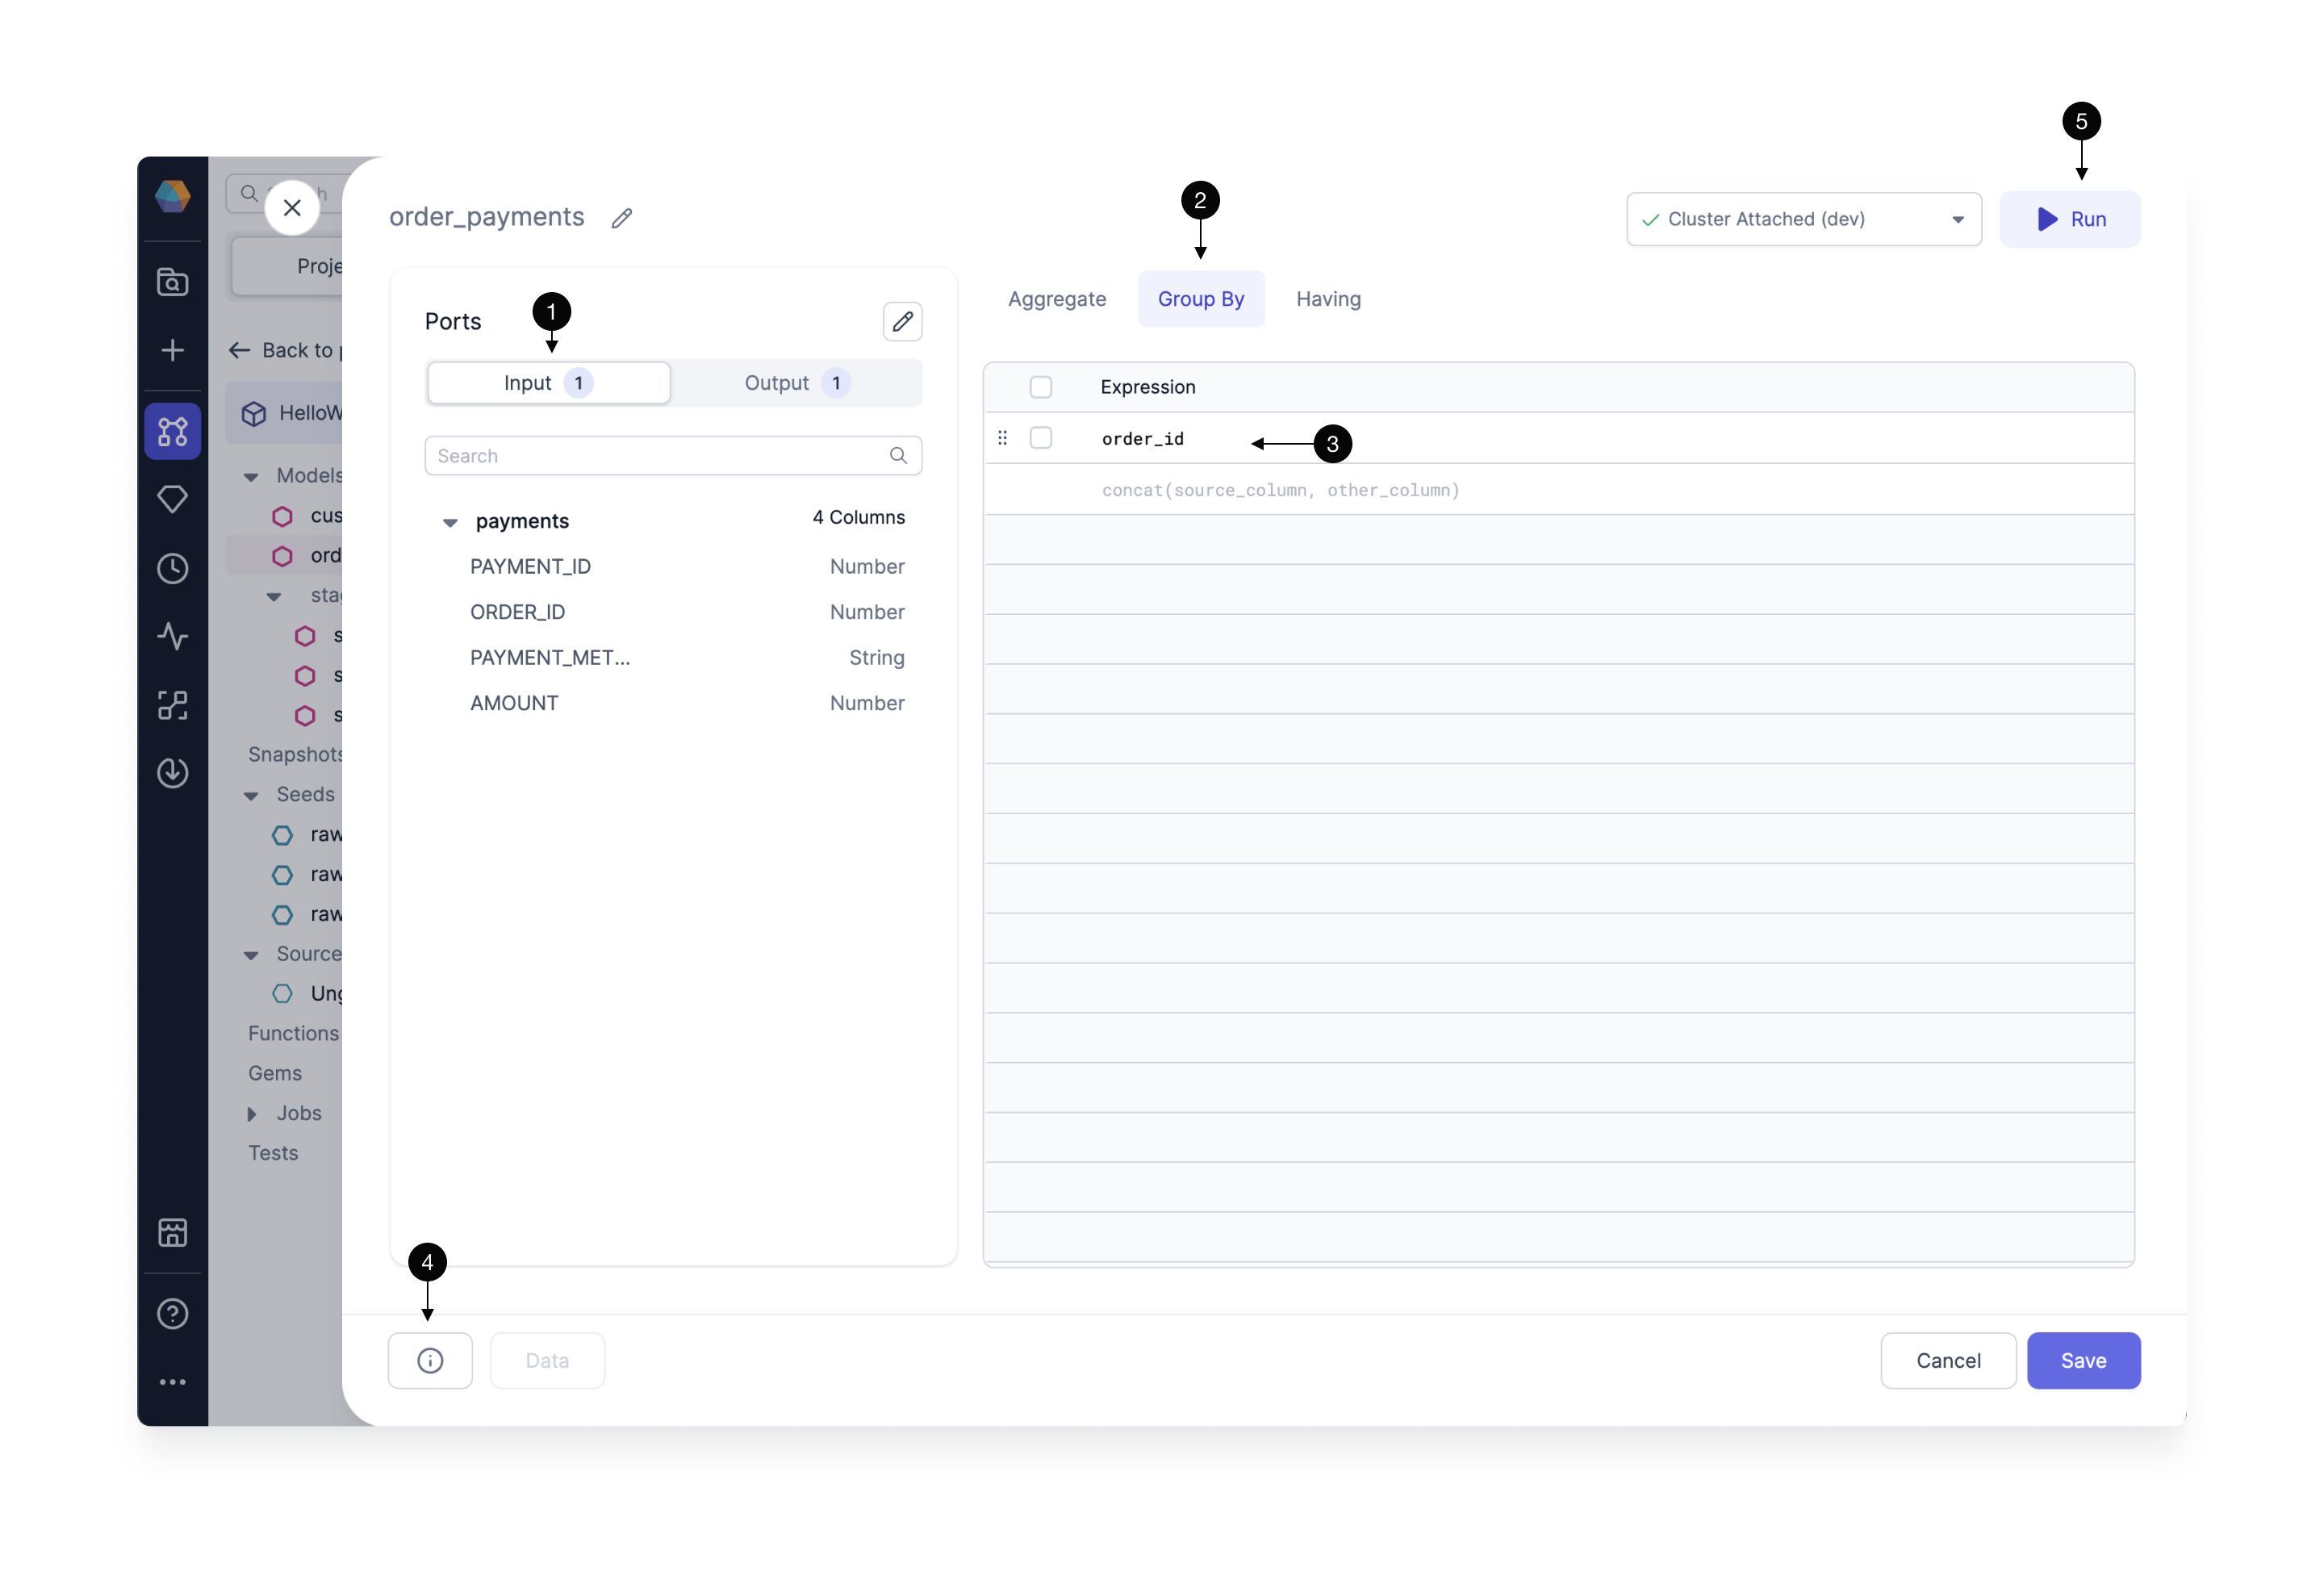
- There is one Input Dataset,
payments, and we can see the columns and datatypes below. - Open the GroupBy tab.
- We can see the Gem is configured to group according to the
order_idcolumn. Just click any column name listed in (1) Input to add a column to the GroupBy expressions. - Syntax errors are surfaced here as you're designing your Gem (and Model) on the canvas. That's handy so you don't have to run a Job to discover a typo.
- The Run button is available here to test and view data samples. This way you can make sure your Aggregate Gem is configured as desired.
Aggregate expressions
Next we'll walk through the Aggregate tab, where we have a lot more bells and knobs to turn.
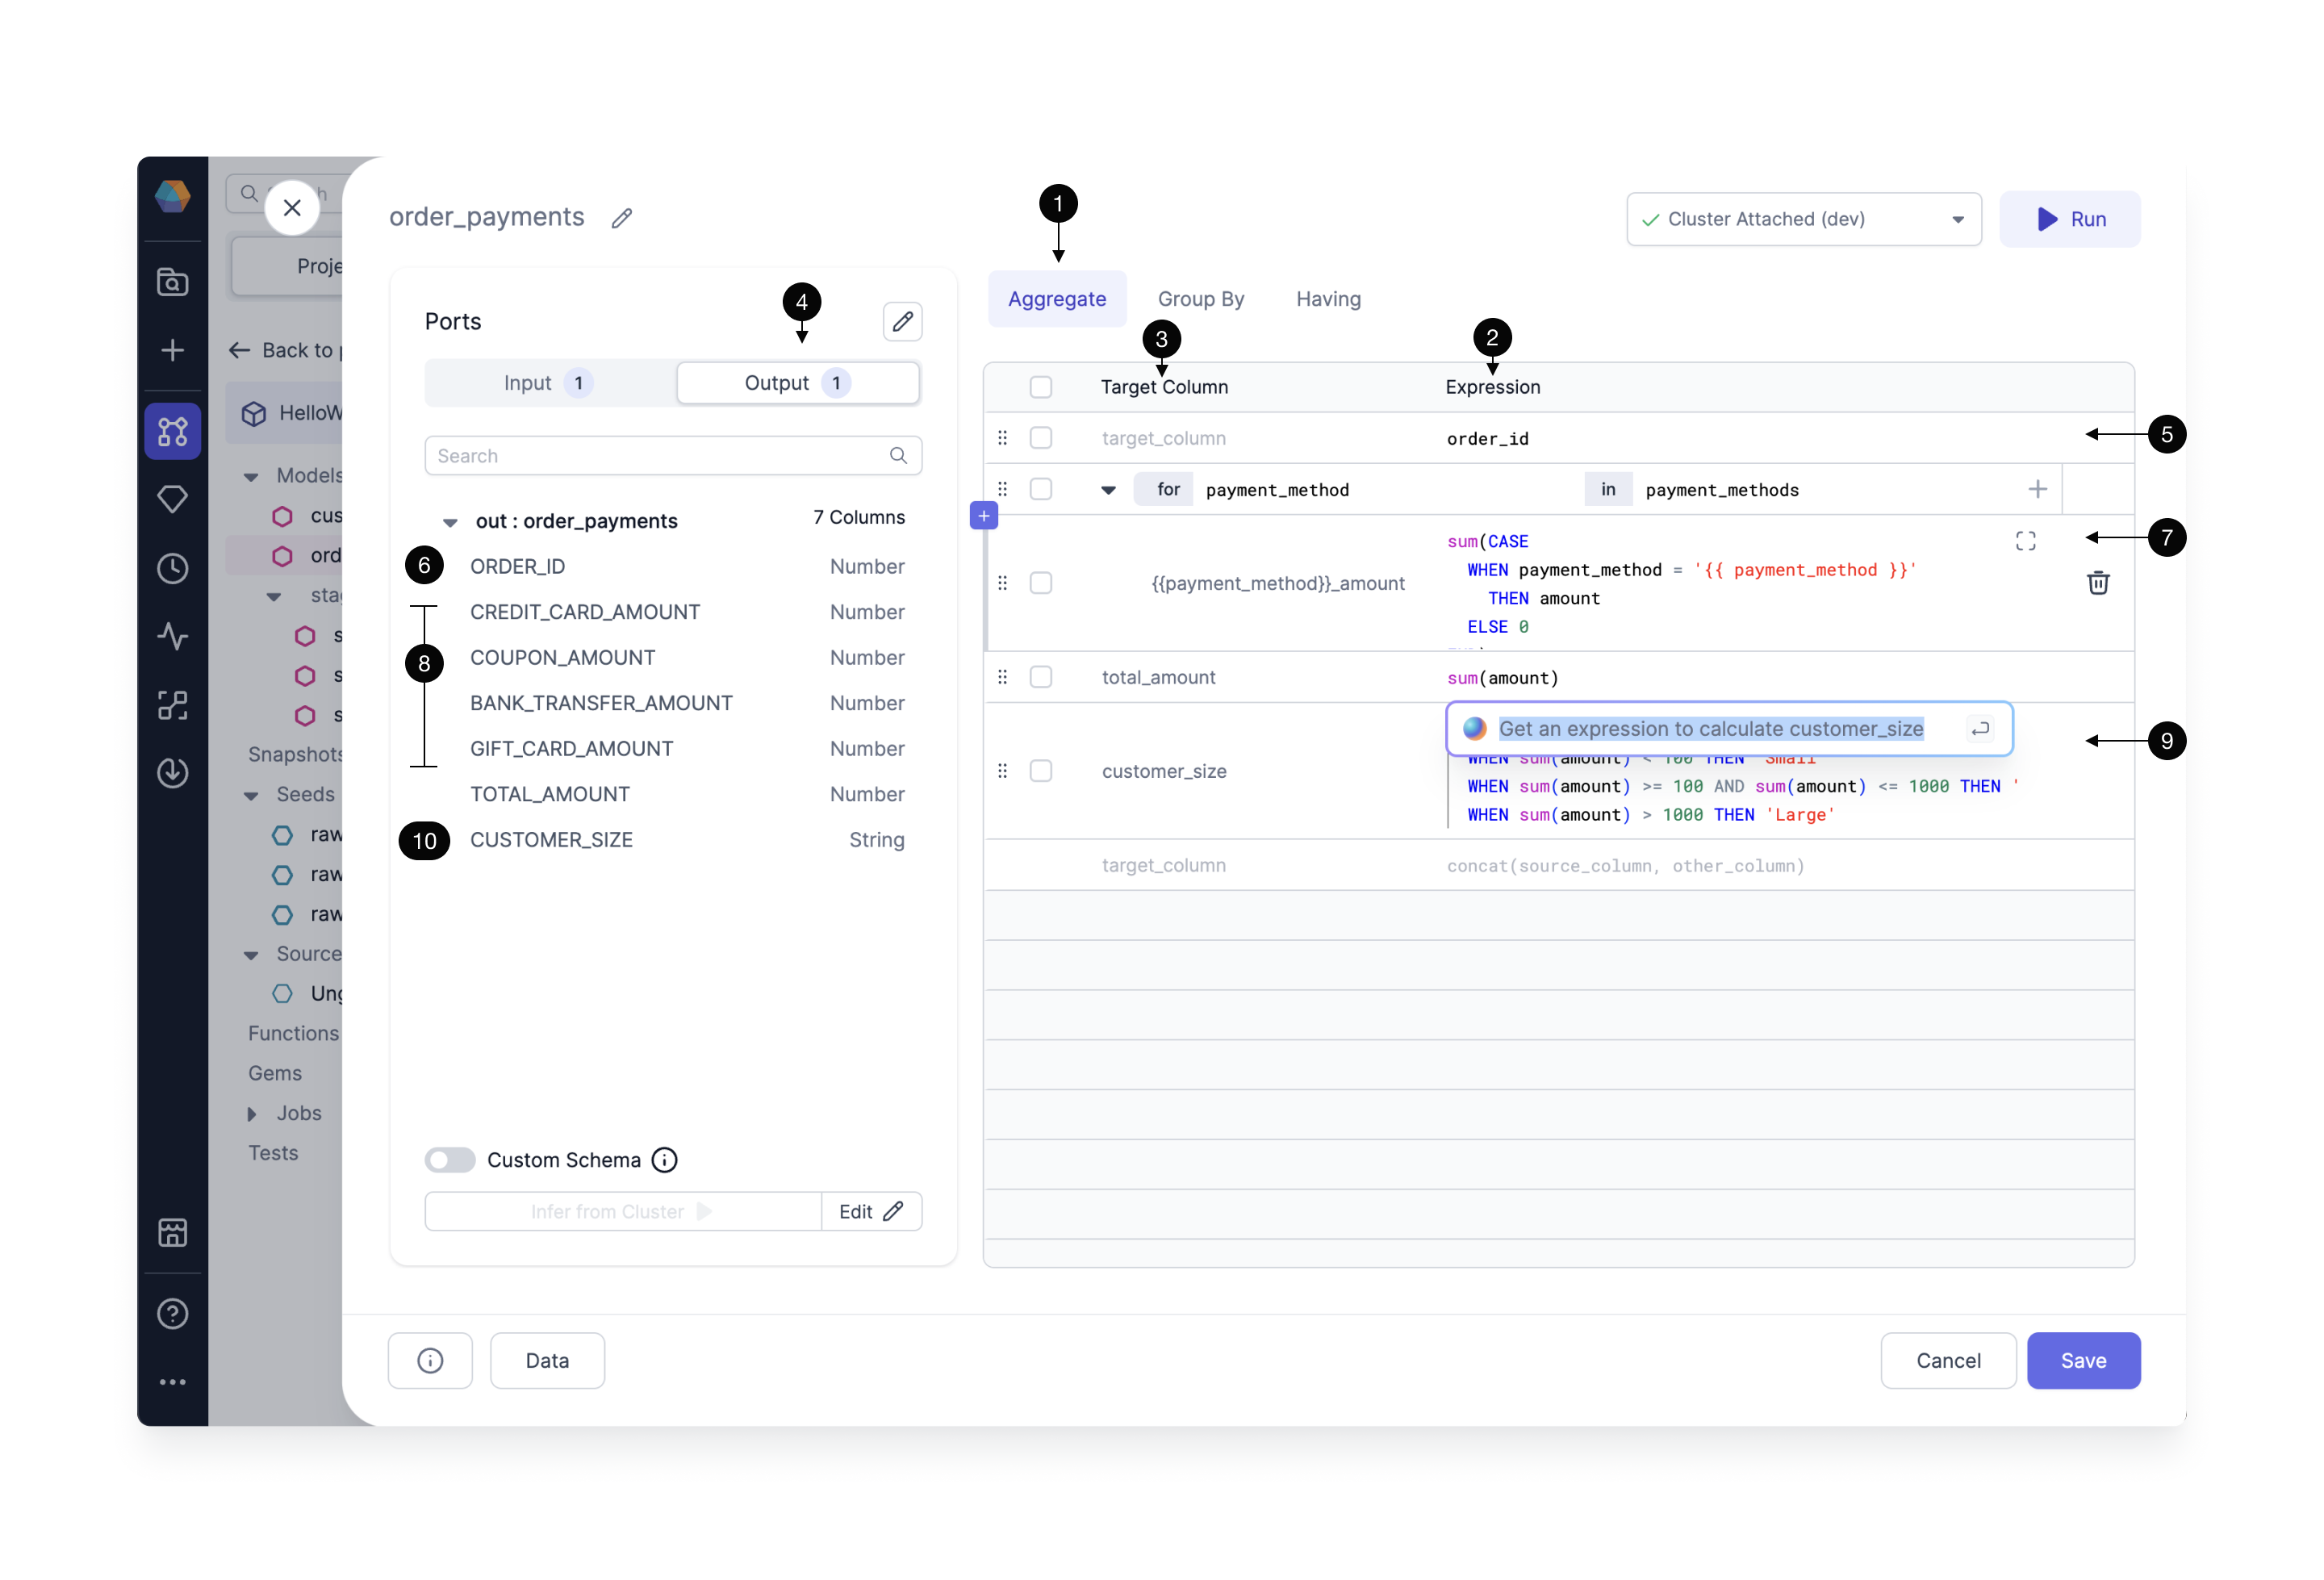
- Click the Aggregate tab, where we'll define our new column names and data manipulation expressions.
- The list of Expressions describe how to manipulate a particular column from the input Dataset.
- The list of Target Columns is the list of column names to be manipulated by the Aggregate Gem and included in the Gem's output.
- Click Output to see the schema of the Dataset resulting from the Aggregate Gem.
- The
order_idcolumn is getting passed through the Aggregate step without being changed. Recall this is the column that will be used to group the data. To add any column, just click the column name from the Input list, or start typing the column name and Prophecy Copilot will provide suggestions. - Since the
order_idcolumn was (5)selected, then this column appears in the output Dataset. It has a number datatype. - Here is an expression that includes some data manipulation logic. The amount is summed according to the payment method.
payment_methodis being passed as a configurable variable surrounded by curly braces{{ }}. We'll see how to configure the variablescredit_card,coupon,bank_transfer,gift_cardin the next section. - These are the output columns according to the (3)Target Column.
{{ payment_method }}is a configurable parameter, and each of the payment methods (e.g. GIFT_CARD) has been appended with the stringamount. Now we are starting to see how the data sample output from the Aggregate Gem will be constructed. - Let's AskAI to help write a new expression. Type "Calculate customer size based on the amount purchased." Copilot AI generates a SQL expression and we can keep or reject the suggestion.
- The new expression will be reflected in the Aggregate Gem output,
CUSTOMER_SIZEcolumn.
Using Variables
Now let's see how to configure the payment_methods variable.
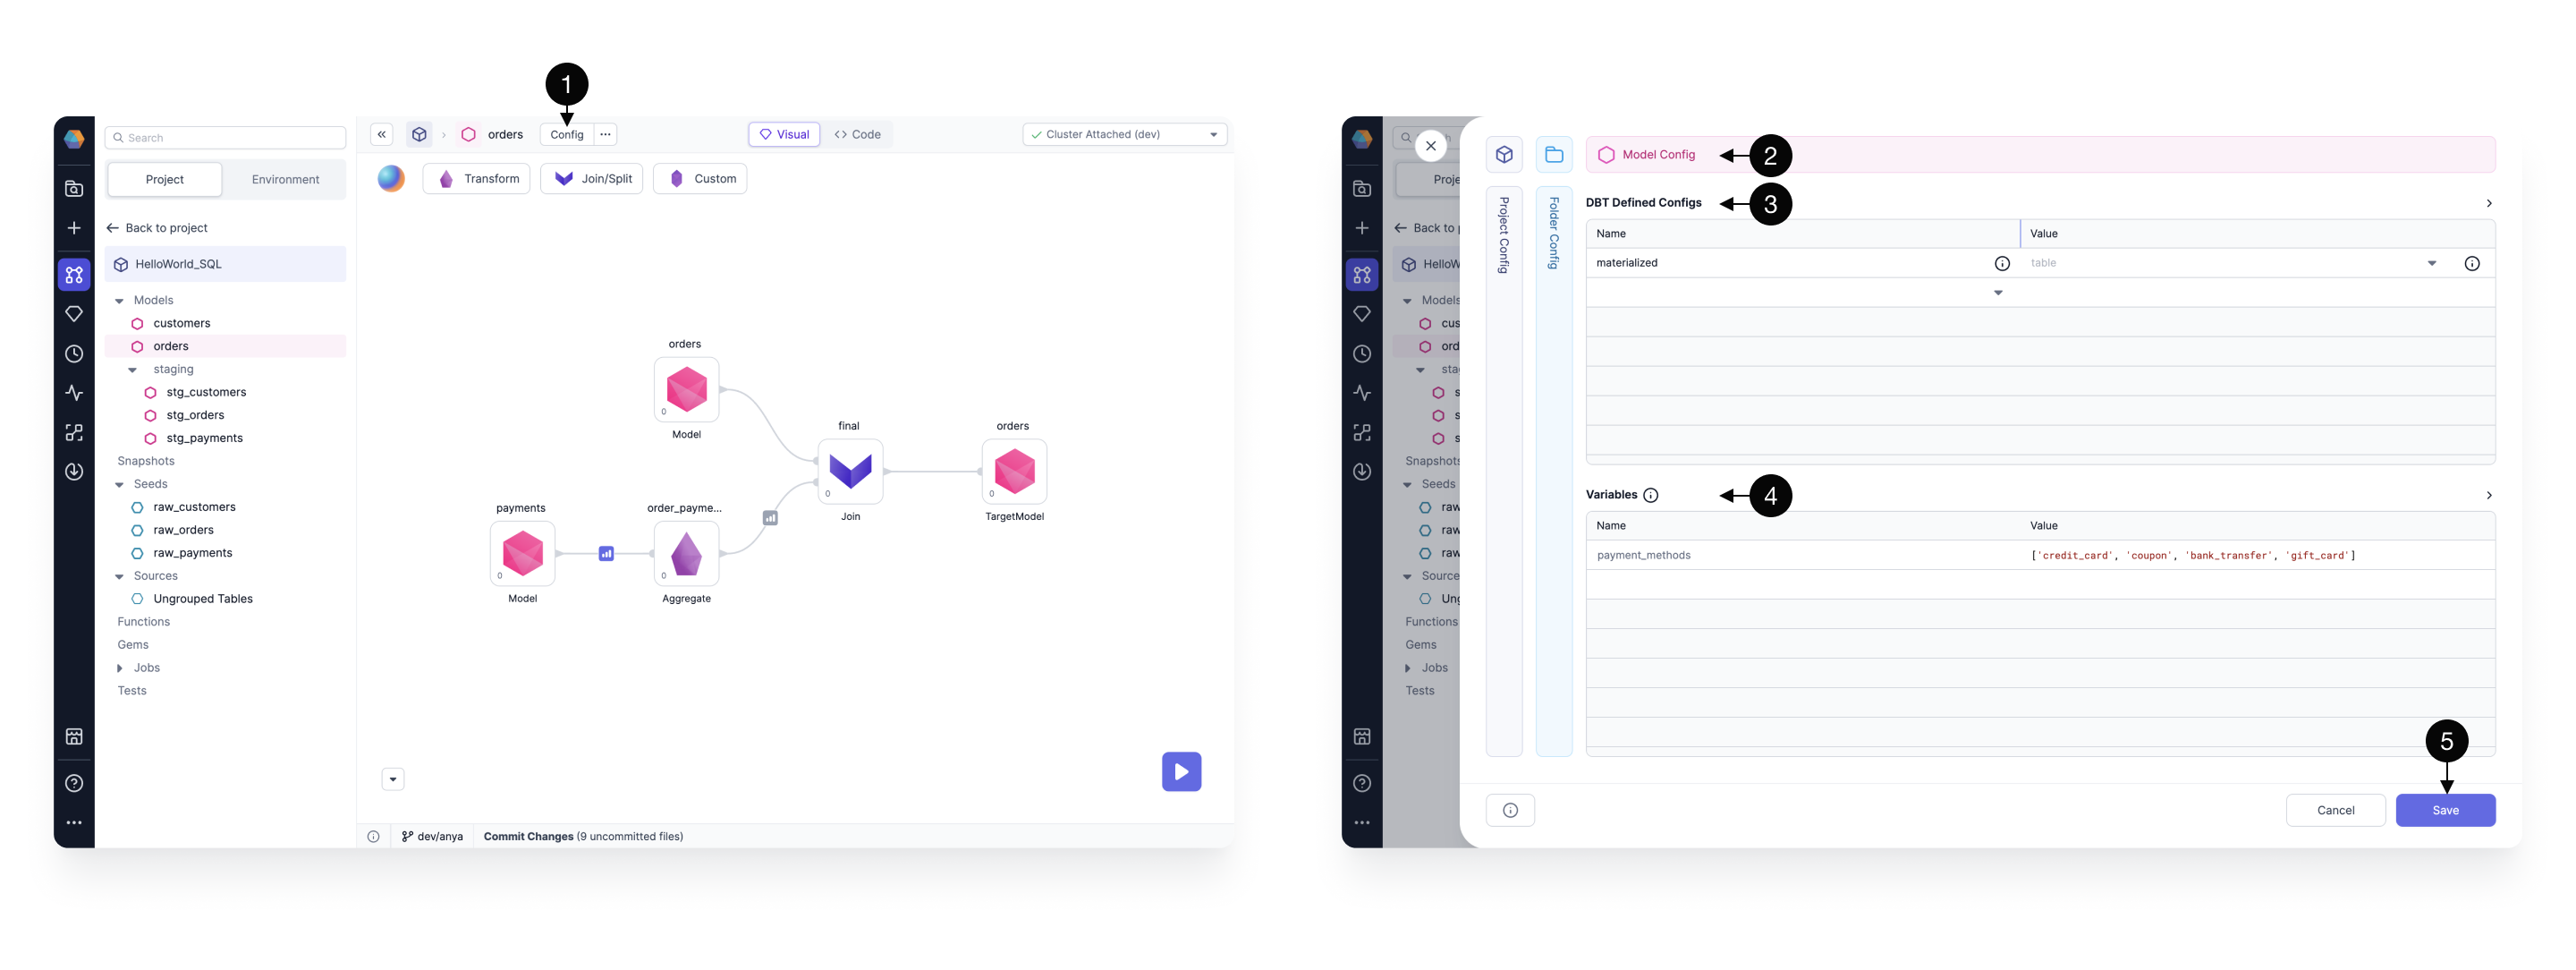
- Click Config to open the configuration screen.
- We see the option to apply a configuration at several different levels: apply to the entire Model, all the Models in the Github folder, or all the Models in the Project. Here we can see there are Configurations that apply to this particular
OrdersModel. - See the list of DBT Defined Configs. These are configs every user could employ with their DBT Projects, such as whether to materialize the model as table, view, ephemeral, or incremental. Click the dropdown to select the config of interest, then enter the appropriate value. Hover over the "i" icon for a short description of each DBT Config.
- See the list of user-defined Variables. In our HelloWorld_SQL project, the
payment_methodsvariable has been defined with the four values shown. - Click Save after editing the Config for the Model, Folder, or Project.
Click the code view to see the Config encoded in the dbt_project.yml file or the schema.yml/properties.yml file. Further information can be found in DBT documentation, as Prophecy's Model Config is based on DBT's Model Configurations.
Using Config variables (and DBT Defined Configs) within a Gem is easy. Just wrap the variable name (e.g. payment_method) in curly braces {{ }} like this: {{ payment_method }}.
Here we used the Aggregate Gem from the HelloWorld_SQL Project as a learning guide. What types of Aggregations will you build? Reach out with questions and to let us know how you're using Prophecy.