Use the Visual Expression Builder
Develop your SQL expressions by using the Visual Expression Builder, which shows you available columns and functions that you can use to build your expressions.
Navigate to the Visual Expression Builder
The Visual Expression Builder is supported wherever you see Visual and Code views within your transformation Gems.
- Create or open an existing transformation Gem, and select the Visual view.
The view you select persists across your Gems.
All of the expressions you build using the Visual Expression Builder are converted to code in the Gem and Model Code views. Similarly, edits you make in the Code view, whether it's in an expression or condition editor, will be converted into Visual view.
This allows you to take advantage of both Visual and Code views when building your expressions.
Build an expression
Using the Visual Expression Builder, you can build an expression using the following modes:
- Simple Expression: This mode allows you to choose an expression, like a column, function, or Case statement.
- Comparison: This mode allows you to compare two simple expressions. You have the option of using conditions, such as
IFandELSEIFstatements. - Grouping: This mode allows you to build complex conditions by allowing the combinations of comparision expressions using logical operators
ANDorOR.
See which Gems support which modes in the following table:
| Simple Expression mode | Comparison mode | Grouping mode | |
|---|---|---|---|
| Aggregate | |||
| Filter | |||
| Join | |||
| Reformat |
Build using the Simple Expression mode
Let's use a Join Gem to build simple expressions.
Join example
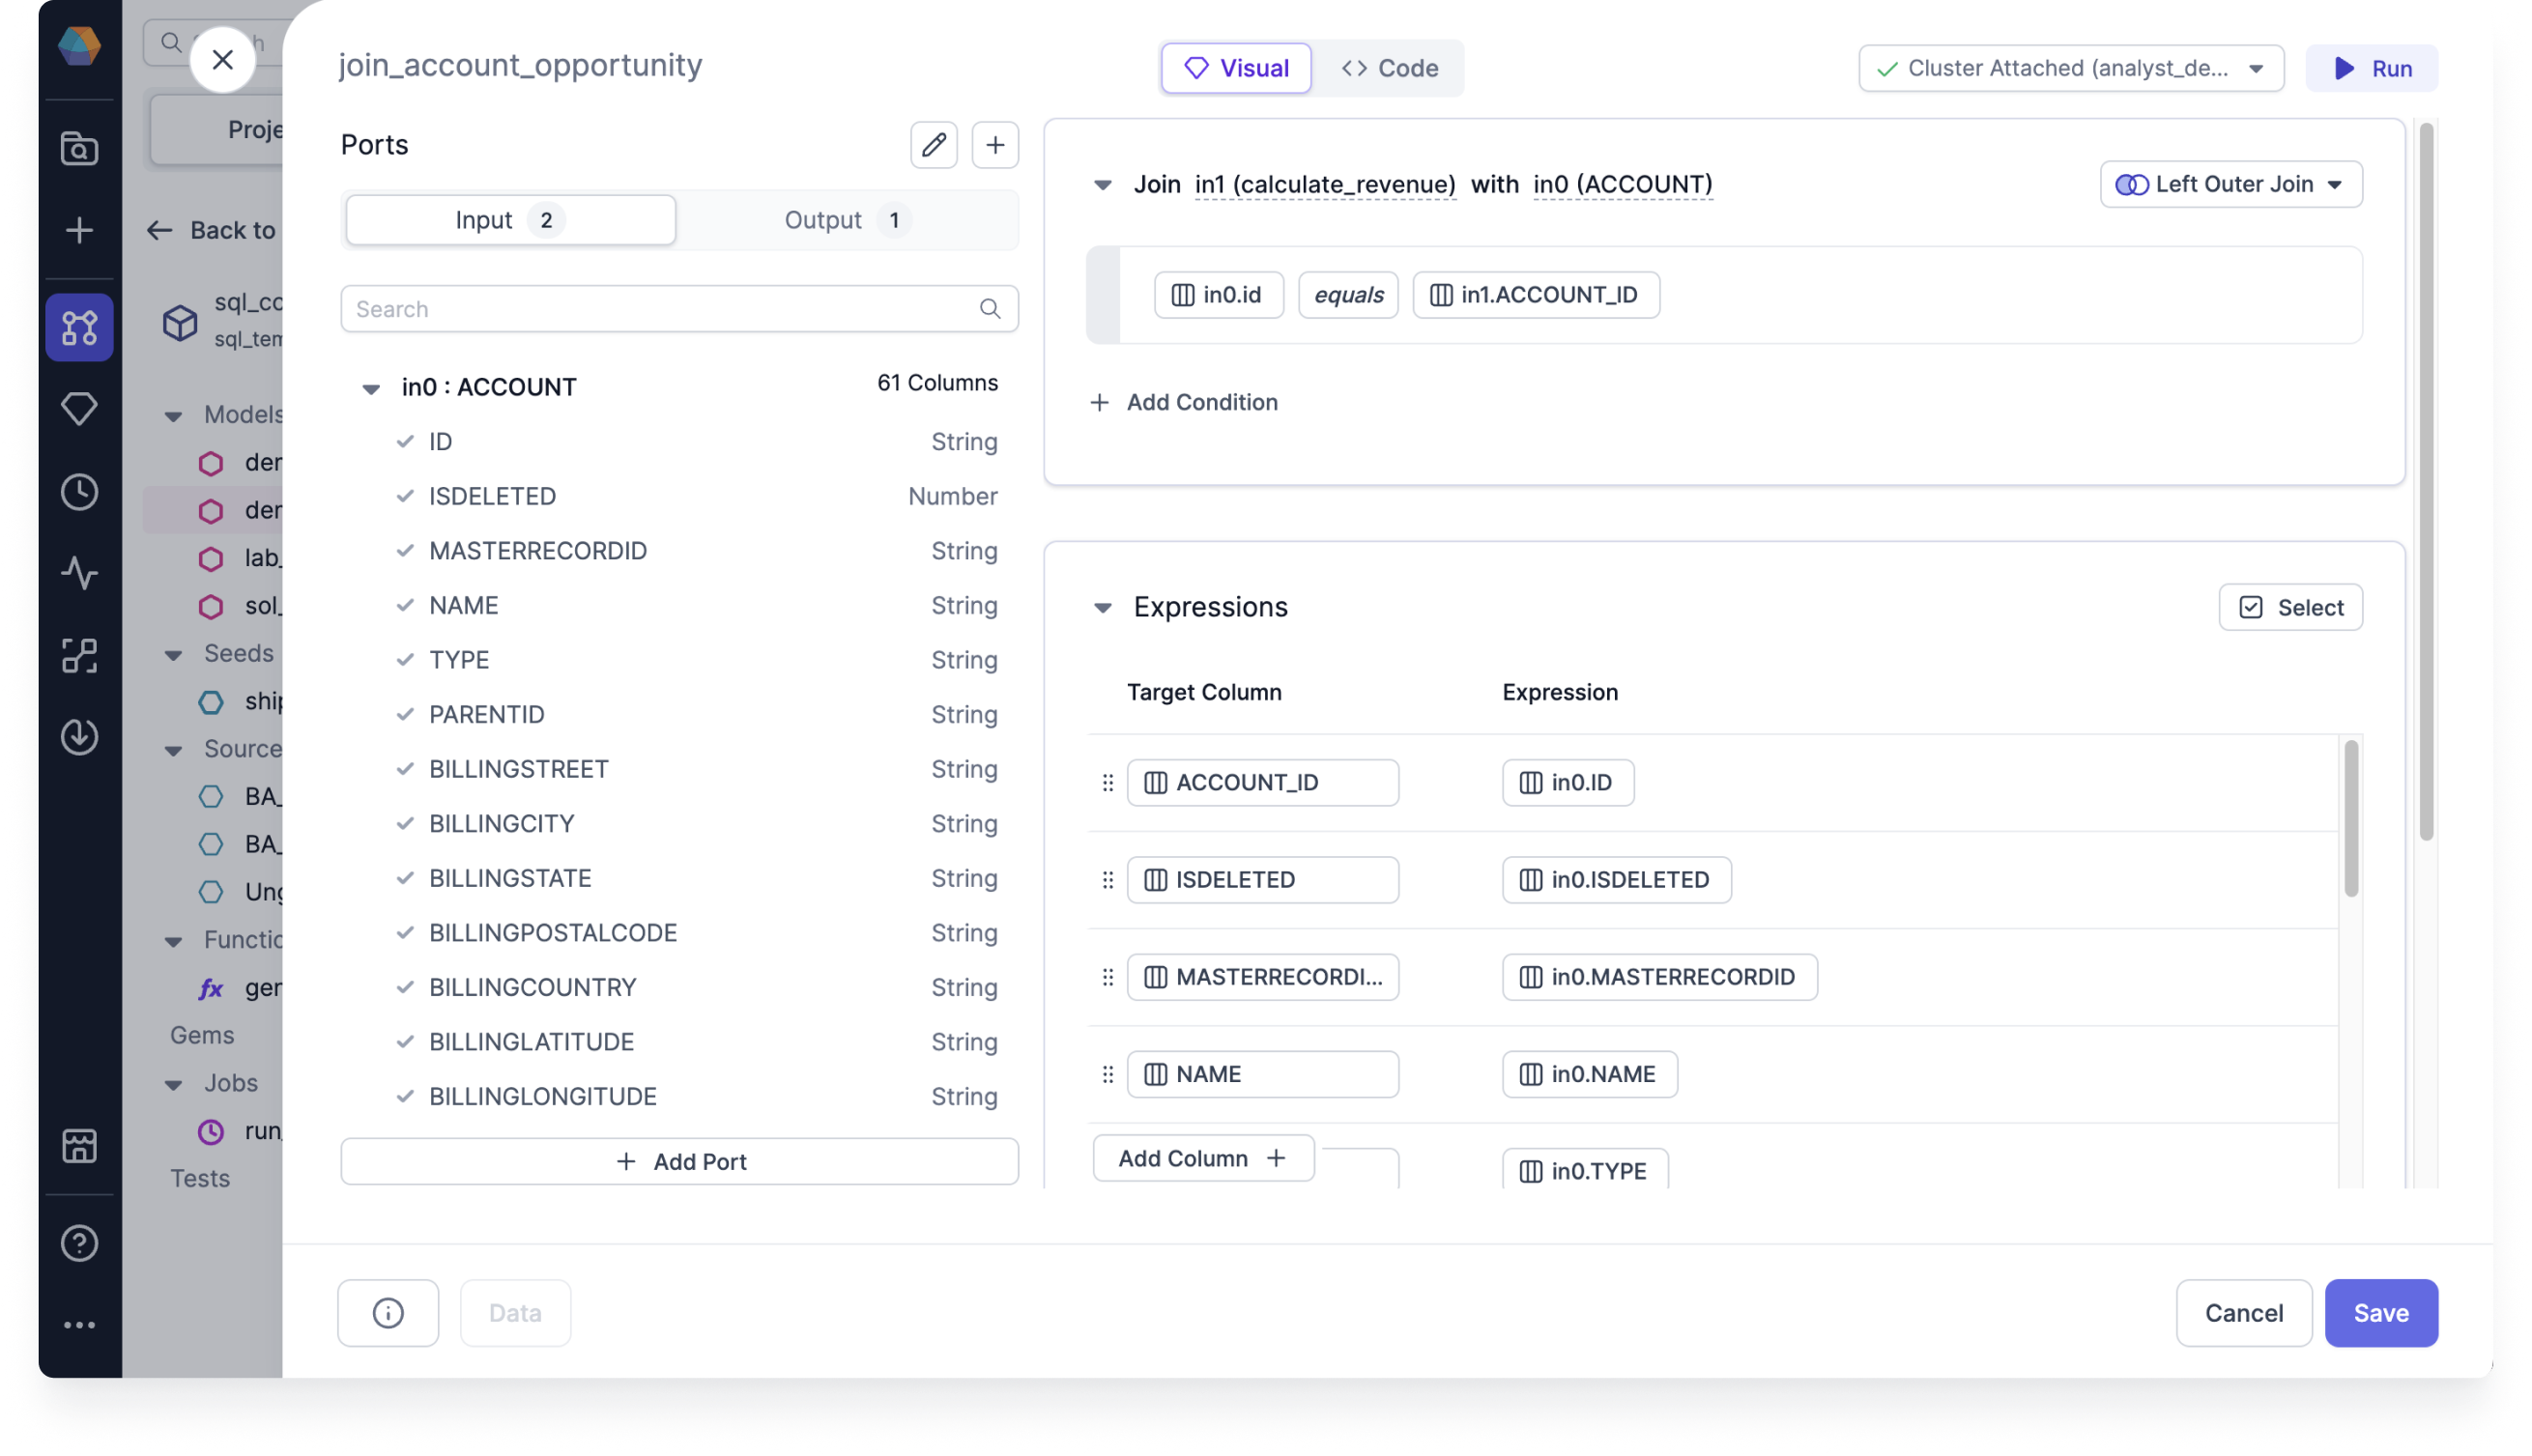
In our Join example, we want to join the in0 account table with the in1 expected revenue table matching the account IDs.
To set up the join condition, follow these steps:
- After creating the Join Gem, in the Join section, click +Add Condition. An option to Select expression appears.
- Click Select expression and select Column. Search for or click to select
in0.idfrom the populated list. An option to Select operator appears. - Click Select operator and select the Comparison operator
equals. An option to Select expression appears. - Click Select expression and select Column. Search for or click to select
in1.ACCOUNT_IDfrom the populated list.
To set up the simple expressions, follow these steps:
- In the Expressions section, click Add Column +. A new expression row appears.
- Click target_column, and then search for or click to select
ACCOUNT_IDfrom the populated list. - Click Select expression and select Column. Search for or click to select
in0.IDfrom the populated list. - Repeat steps 1 to 3 to set up the rest of the matching columns.
Build using the Comparison mode
Let's use a Reformat Gem and a Aggregate Gem to build comparison expressions.
Reformat example
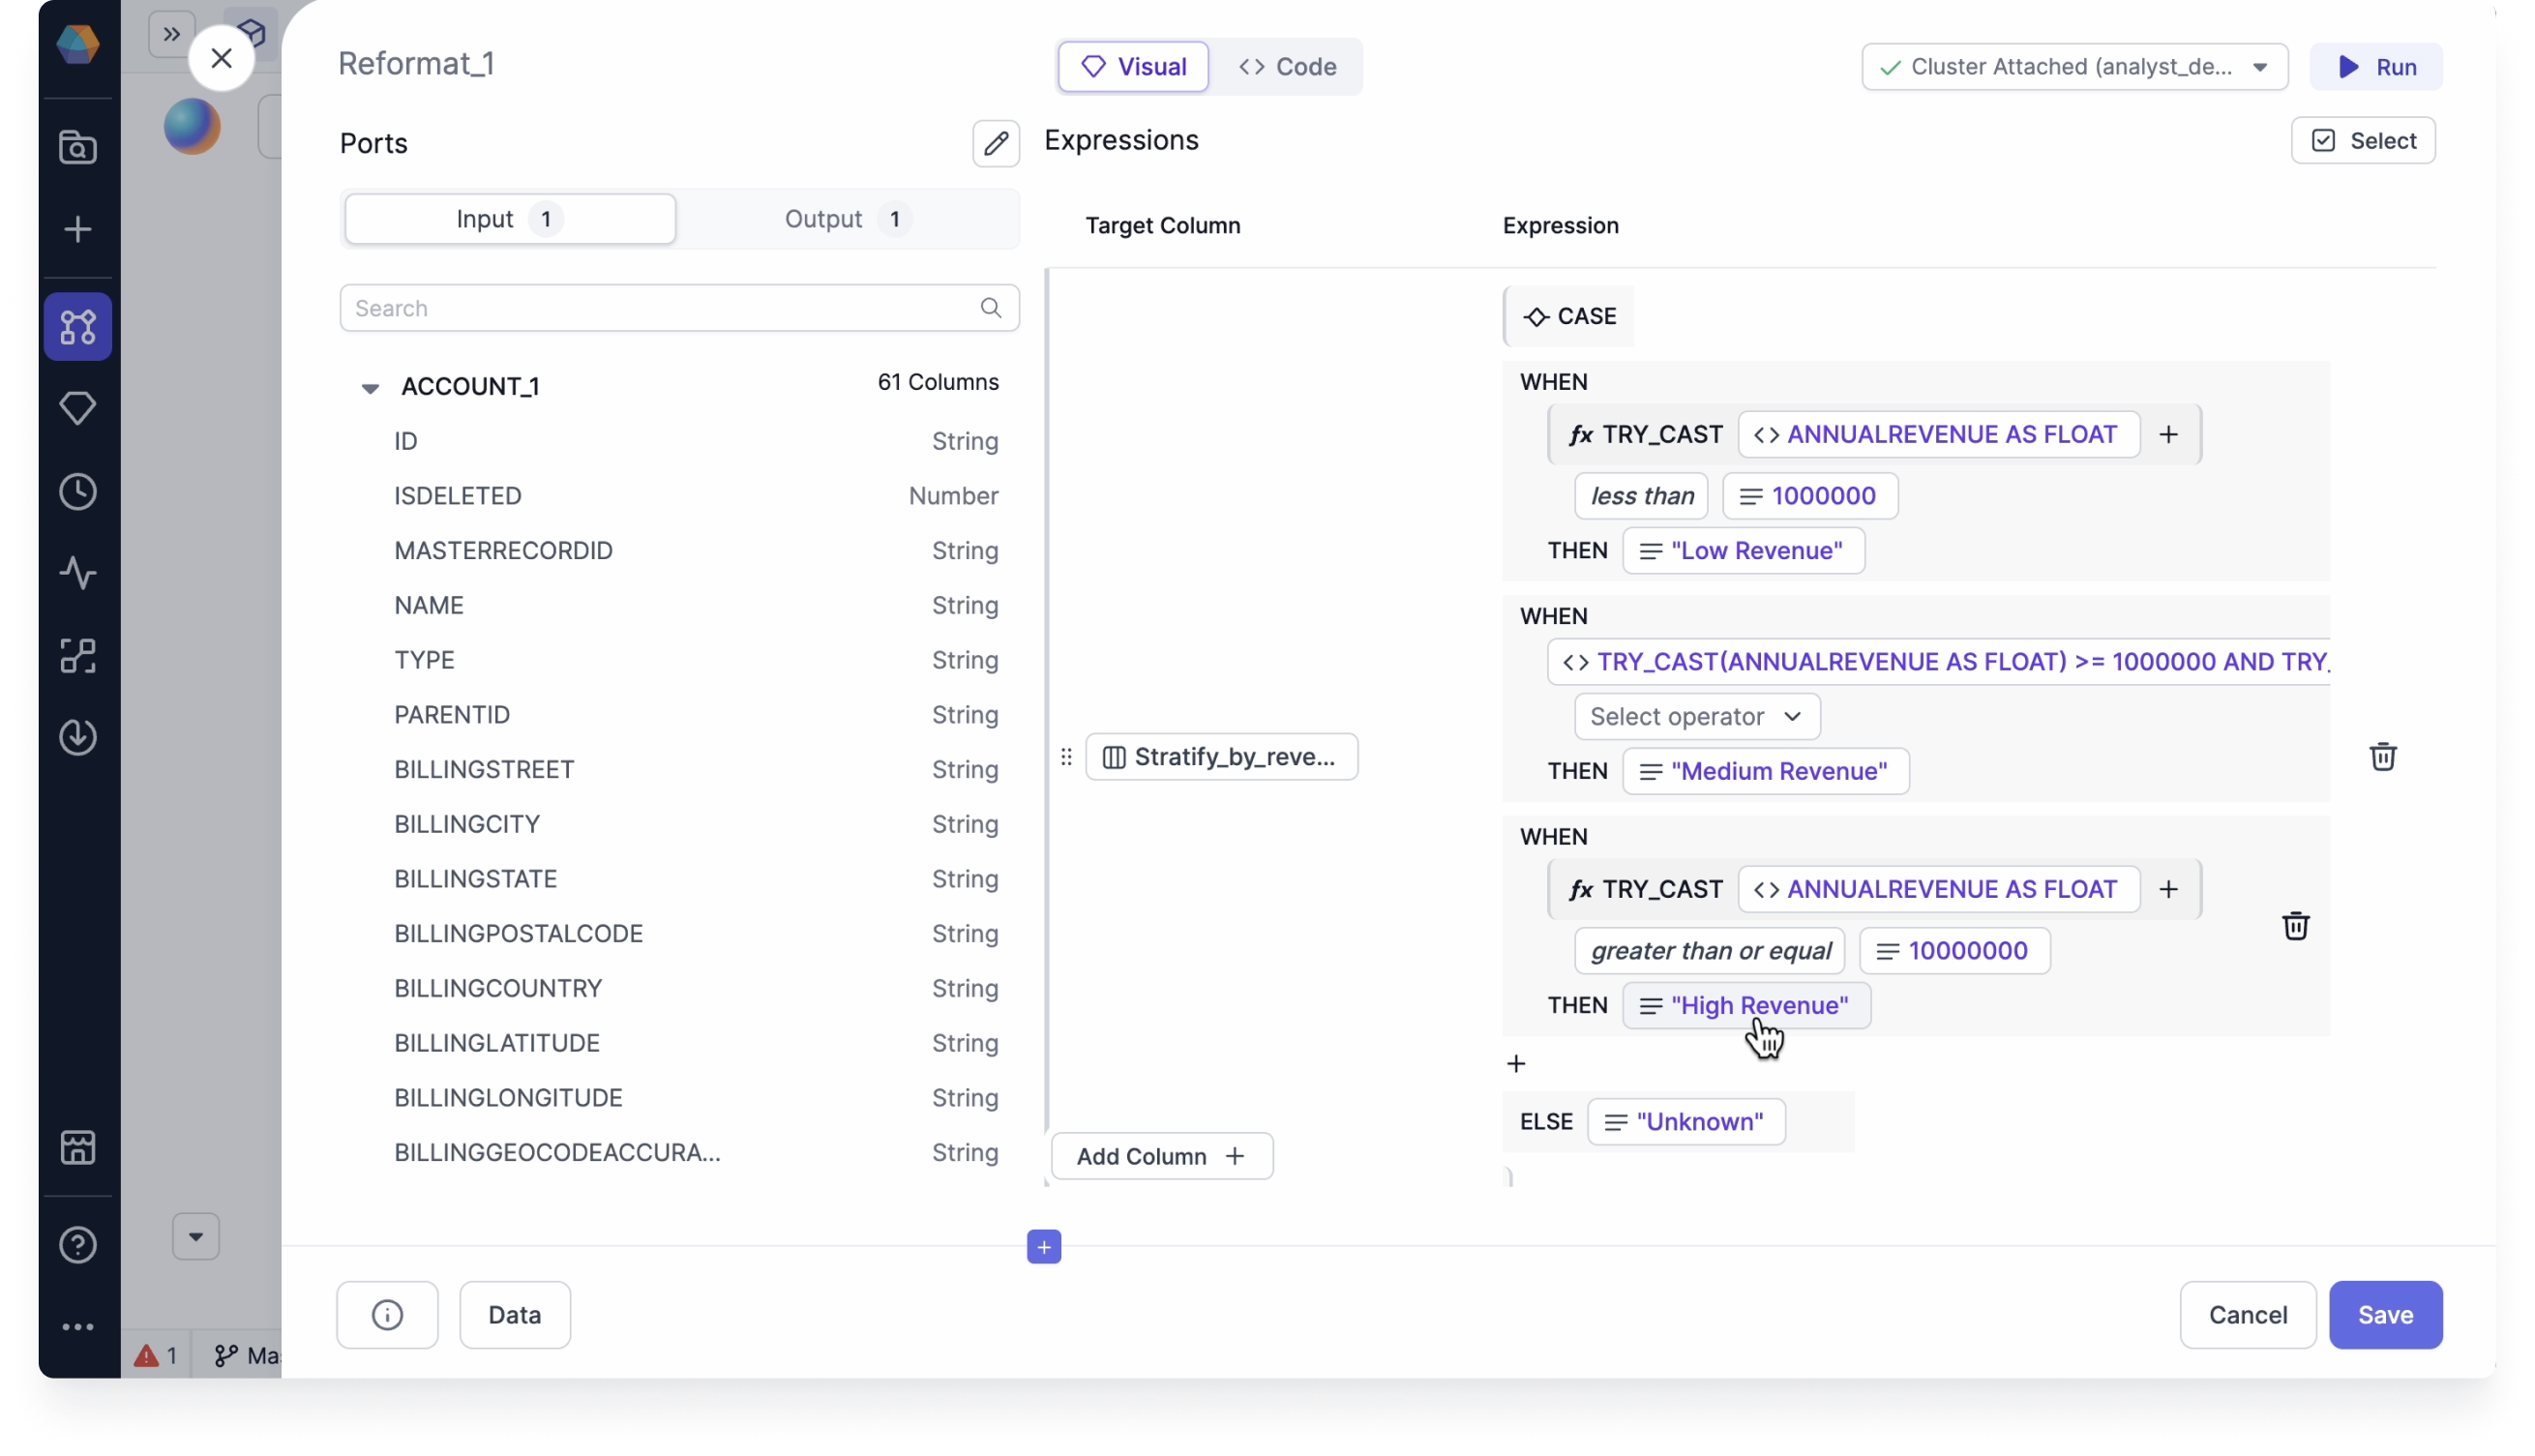
In our Reformat example, we want to stratify the accounts based on their annual revenues. Each condition we set up is limited to one comparison.
To set up the comparison expressions, follow these steps:
- After creating the Reformat Gem, click target_column, and then search for or click to select
ANNUALREVENUEfrom the populated list. - Click Select expression and select Conditional. A
WHENclause appears. - For
WHEN, click Select expression and select Function. Search for and click to selectTRY_CAST, which converts a value of one data type into another data type. An option to select source_string_expr appears. - Click source_string_expr and select Column. Search for or click to select
ANNUALREVENUE AS FLOATfrom the populated list. - Click Select operator and select the Comparison operator
less than. - Click Select expression and select Value. Enter
1000000as the value.tipWhenever you enter a numerical or boolean value, a checkbox appears on the value dialog giving you the option to Check to read value as string.
- For
THEN, click Select expression and select Value. EnterLow Revenueas the value. - Click + on the next line and select Add CASE to add another
WHENclause. - Repeat steps 3 to 8 to set up the rest of the comparison expressions.
- Click + on the next line and select Add ELSE to add an
ELSEstatement.noteYou can add multiple
CASESof theWHENclause, but you can only have oneELSEstatement. - Click Select expression and select Value. Enter
Unknownas the value.
Aggregate example
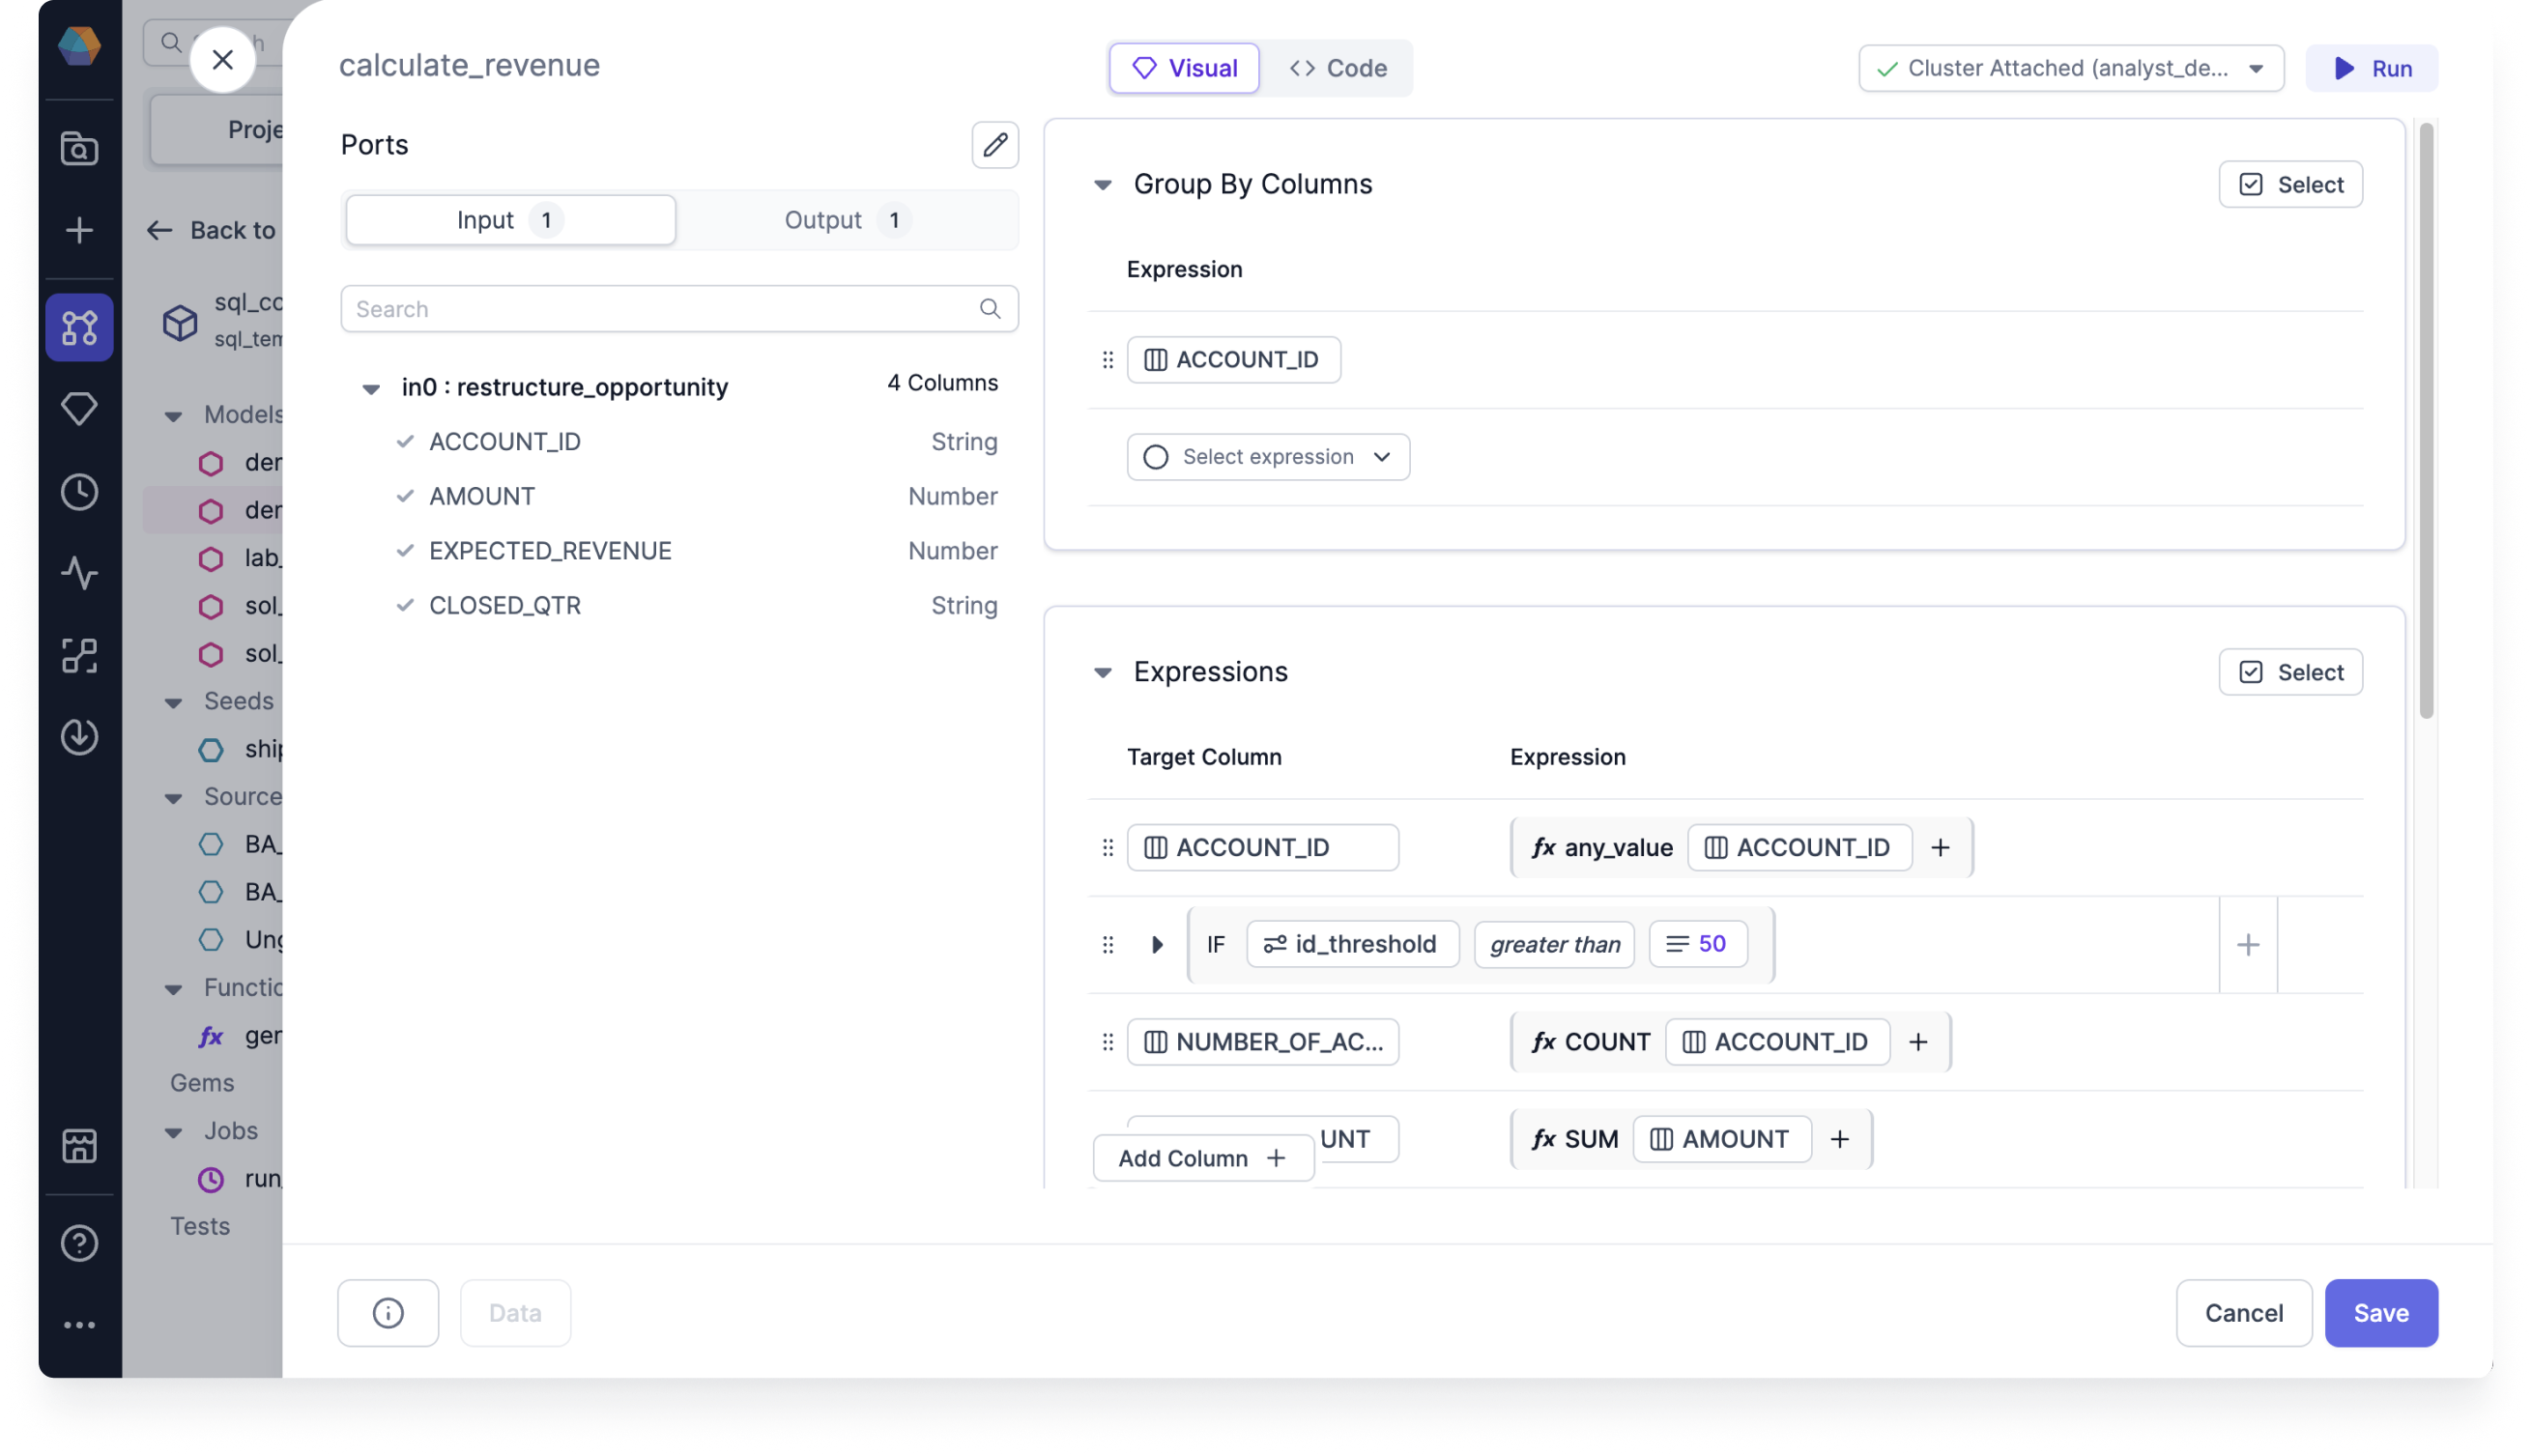
In our Aggregate example, we want to use other conditional expressions, such as IF, to set a threshold limit for ACCOUNT_ID using a configuration variable.
To set up additional comparison expressions, follow these steps:
- After creating and setting up the initial Aggregate Gem, hover your pointer between two expression rows and click + to add a condition. You're given the option to insert another column or an
IForFORcondition. - Select IF. An
IFcondition appears. - Click Select expression and select Configuration Variable. Search for or click to select
id_thresholdfrom the populated list. - Click Select operator and select the Comparison operator
greater than. - Click Select expression and select Value. Enter
50as the value. - Optional: You can hover your pointer below the express row you just created and click + to add another condition. You're now given additional options to insert an
ELSEIForELSEcondition.
Build using the Grouping mode
Let's use a Filter Gem to build grouping expressions.
Filter example
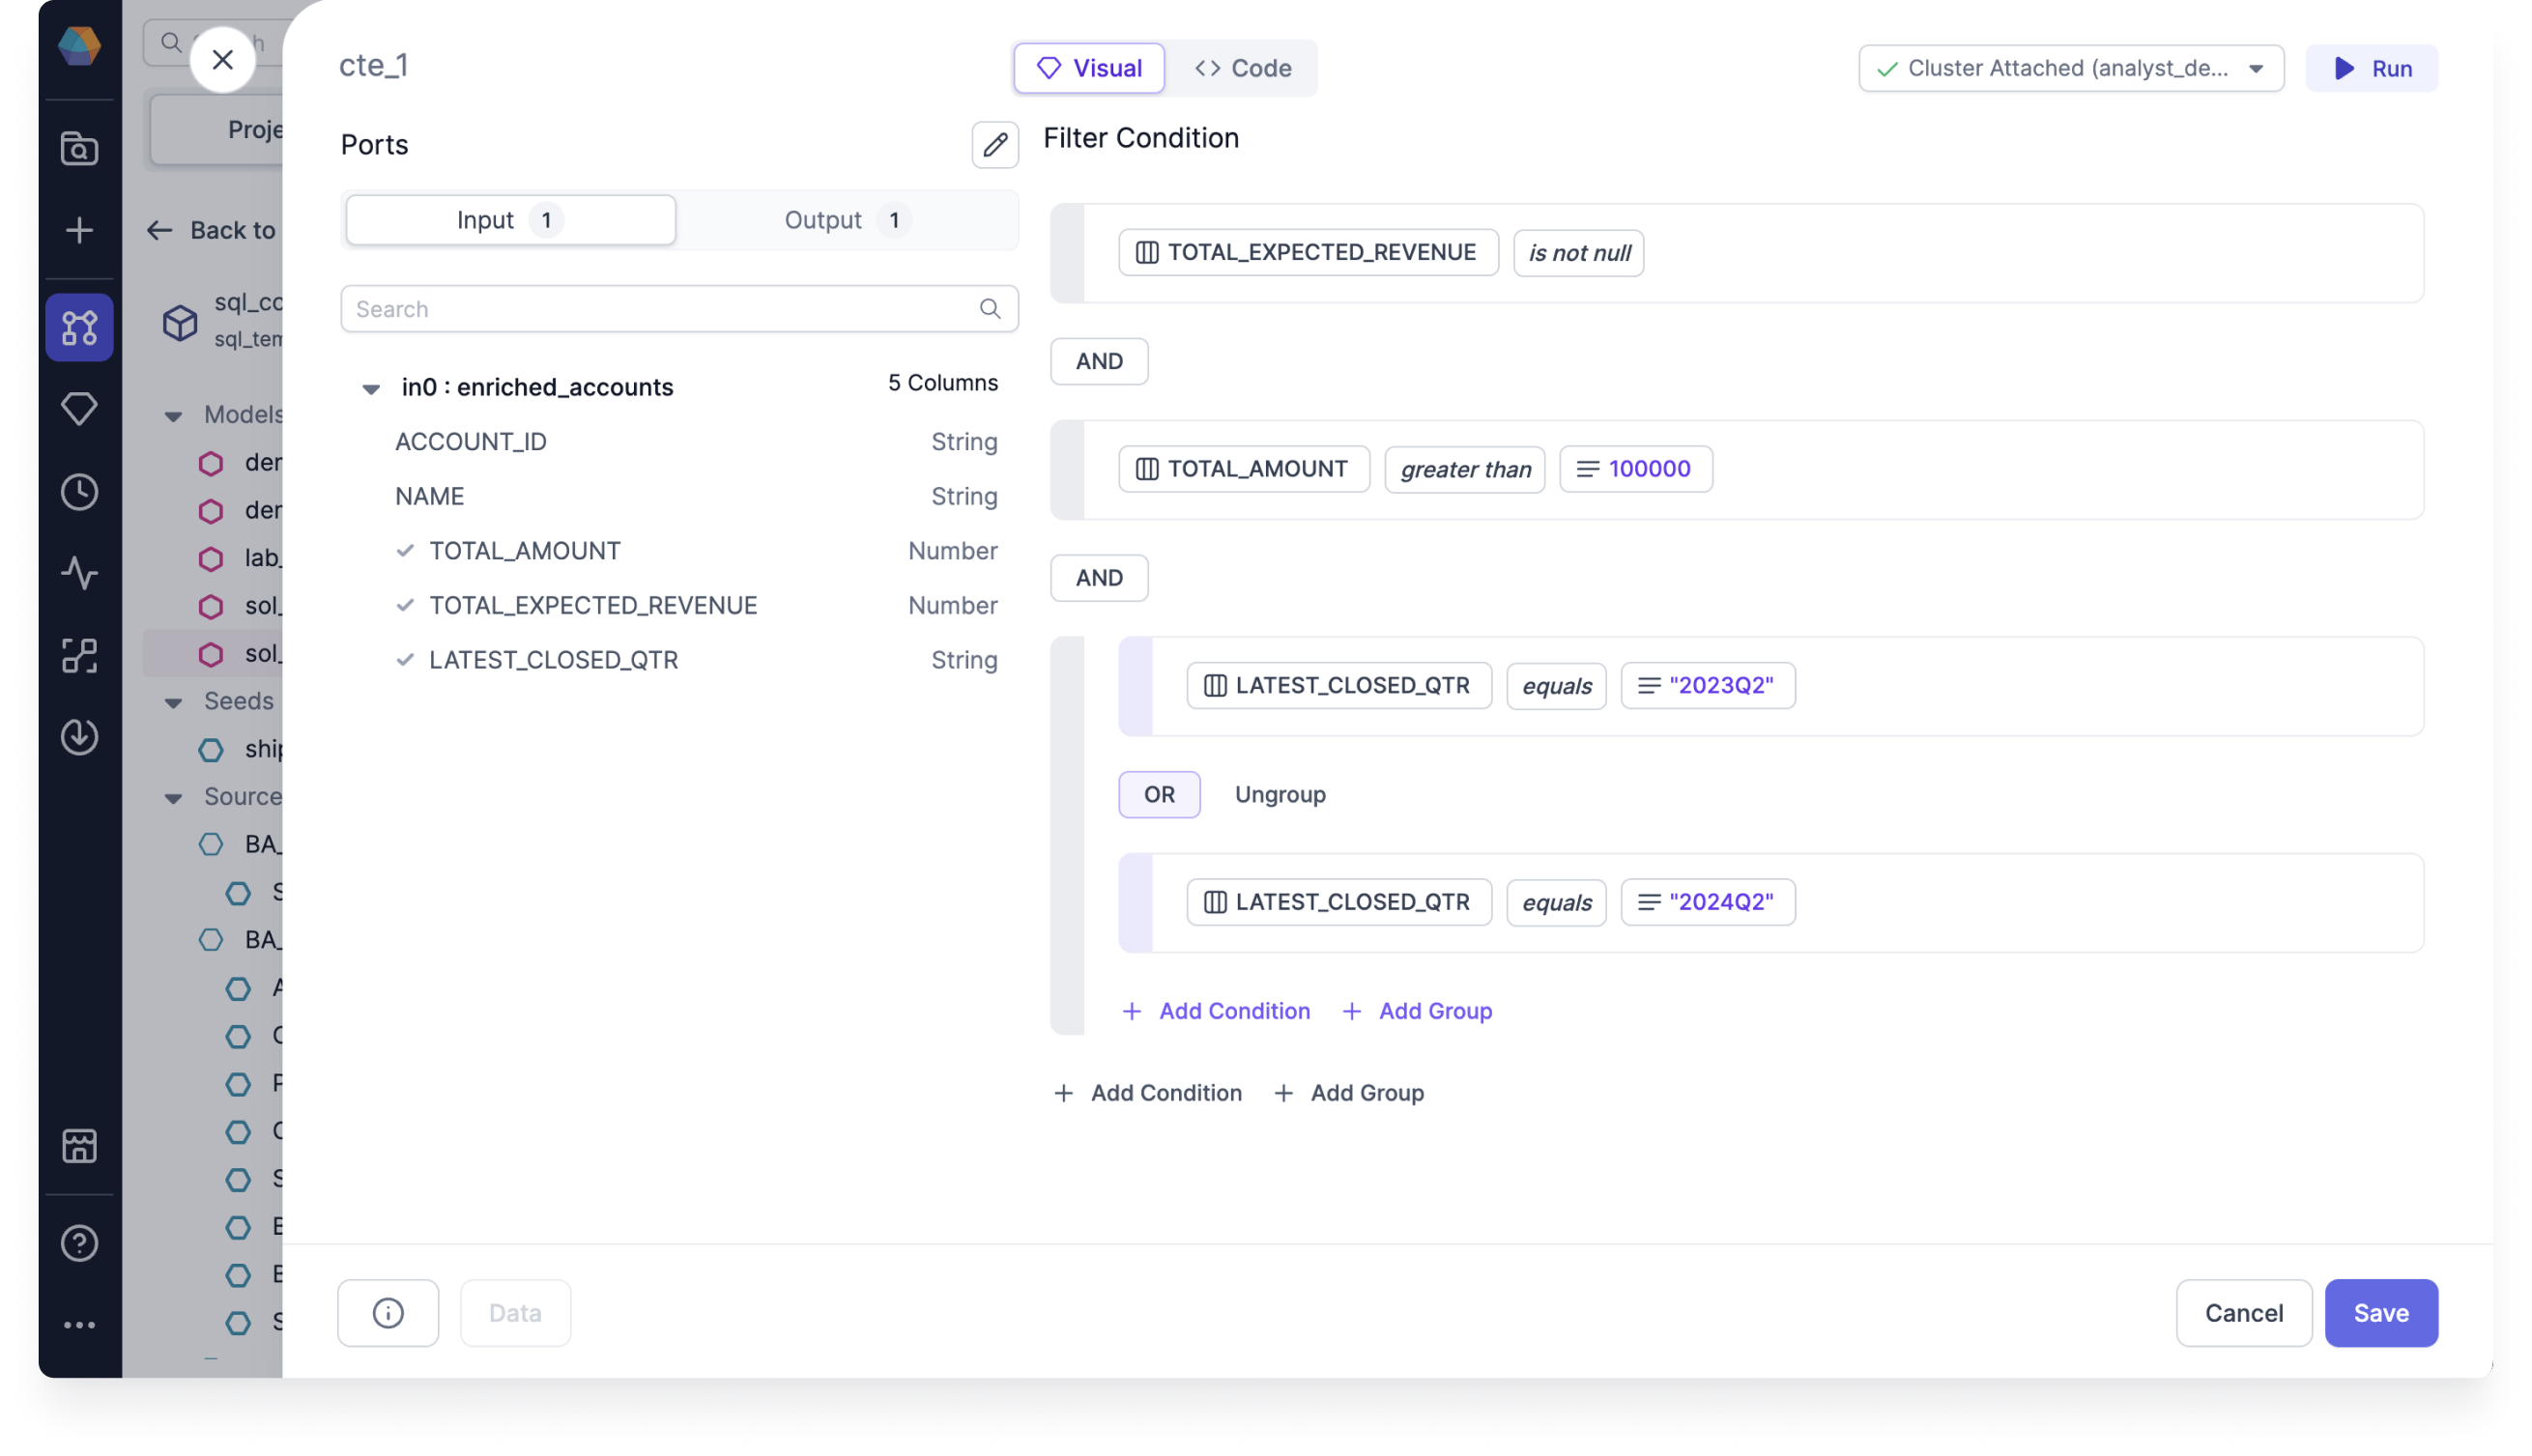
In our Filter example, we want to filter for the following:
- Total expected revenue that
is not null - Total amounts that are greater than
100000 - Latest closed quarters that equals
2023Q2or2024Q2
To set up the grouping expressions, follow these steps:
- After creating the Filer Gem, click Add condition. An option to Select expression appears.
- Click Select expression and select Column. Search for or click to select
TOTAL_EXPECTED_REVENUEfrom the populated list. An option to Select operator appears. - Click Select operator and select the Existence check
is not null. - Click + Add Condition. A new expression row appears.
- Click Select expression and select Column. Search for or click to select
TOTAL_AMOUNTfrom the populated list. An option to Select operator appears. - Click Select operator and select the Comparison operator
greater than. An option to Select expression appears. - Click Select expression and select Value. Enter
100000as the value. - Click Add Group. A grouped expression row appears.
- Click Select expression and select Column. Search for or click to select
LATEST_CLOSED_QTRfrom the populated list. An option to Select operator appears. - Click Select operator and select the Comparison operator
equals. An option to Select expression appears. - Click Select expression and select Value. Enter
2023Q3as the value. - Click + Add Condition and repeat steps 9 to 11 to set up the other
ORcondition.tipYou can have any number of groups and nestings (a group within a group). And you can change the grouping conditions between
ANDandORby clicking on the labels.
Tips
Here are some additional tips to keep in mind when using the Visual Expression Builder:
- The expression dropdowns support search.
- Each argument of your function is another expression since you have the same expression options to choose from.
- You can add optional arguments to your functions.
- You can drag and drop your comparison expressions.
- Just as with conditions, you can also drag and drop your grouping expressions.
- You can delete individual expressions, conditions, and groupings by clicking the trash icon at the end of the rows.
Run and Verify the output
Run the Pipeline up to and including the Gem with your expression, and observe the resulting data sample.
- Click the Play button on either the canvas or the Gem.
Once the code has finished running, you can verify the results to make sure they match your expectations. This Data is same as what you see in interims view. By testing and verifying your expressions, you can ensure that your data analysis tasks are accurate and reliable.