Create a Prophecy App
Prophecy Apps enable teams to create interactive and reusable workflows that simplify data processing. These applications allow users to parameterize pipelines, interact with data, and schedule pipeline runs without modifying the underlying pipeline logic.
When creating a Prophecy App, structure it using pipeline parameters. Pipeline parameters allow applications to dynamically adjust values during execution. By adding interactive components to your apps, users can define parameter values while keeping the rest of the pipeline unchanged.
Objectives
In this tutorial, you'll learn how to create a Prophecy App where users can:
- Upload their own data as a pipeline source.
- Filter the data based on custom input.
- Preview and download the output data.
Prerequisites
To complete this tutorial, you will need:
- Prophecy 4.0 or later.
- A SQL project.
- A Prophecy fabric with a Databricks connection.
This tutorial uses sample data provided by Databricks.
Create the pipeline
Before building a Prophecy App, start by creating the pipeline it will run. You'll develop a pipeline that:
- Ingests bakehouse review data from the SQL warehouse.
- Filters the data by franchise location.
- Saves the filtered data to a table.
This pipeline will include parameters that end users can assign values to through the app interface.
Create a pipeline parameter
Pipeline parameters enable dynamic behavior in pipelines by allowing values to be set at runtime. In this case, these values can be driven by inputs from external sources, including user input through a Prophecy App.
In this section, you’ll define a pipeline parameter specifically for use in a Prophecy App. The parameter will capture the franchise ID that the user selects, allowing the pipeline to filter reviews based on the franchise they want to see.
- Open the pipeline that will be used for the app.
- Click Config in the project header.
- Select + Add Parameter.
- Name the parameter
franchise_id. - Set the parameter type to
int. - Click Select expression > Value.
- Enter
3000007as the default value to be used during interactive pipeline runs. (This is an arbitrary franchise ID.) - Click Save.
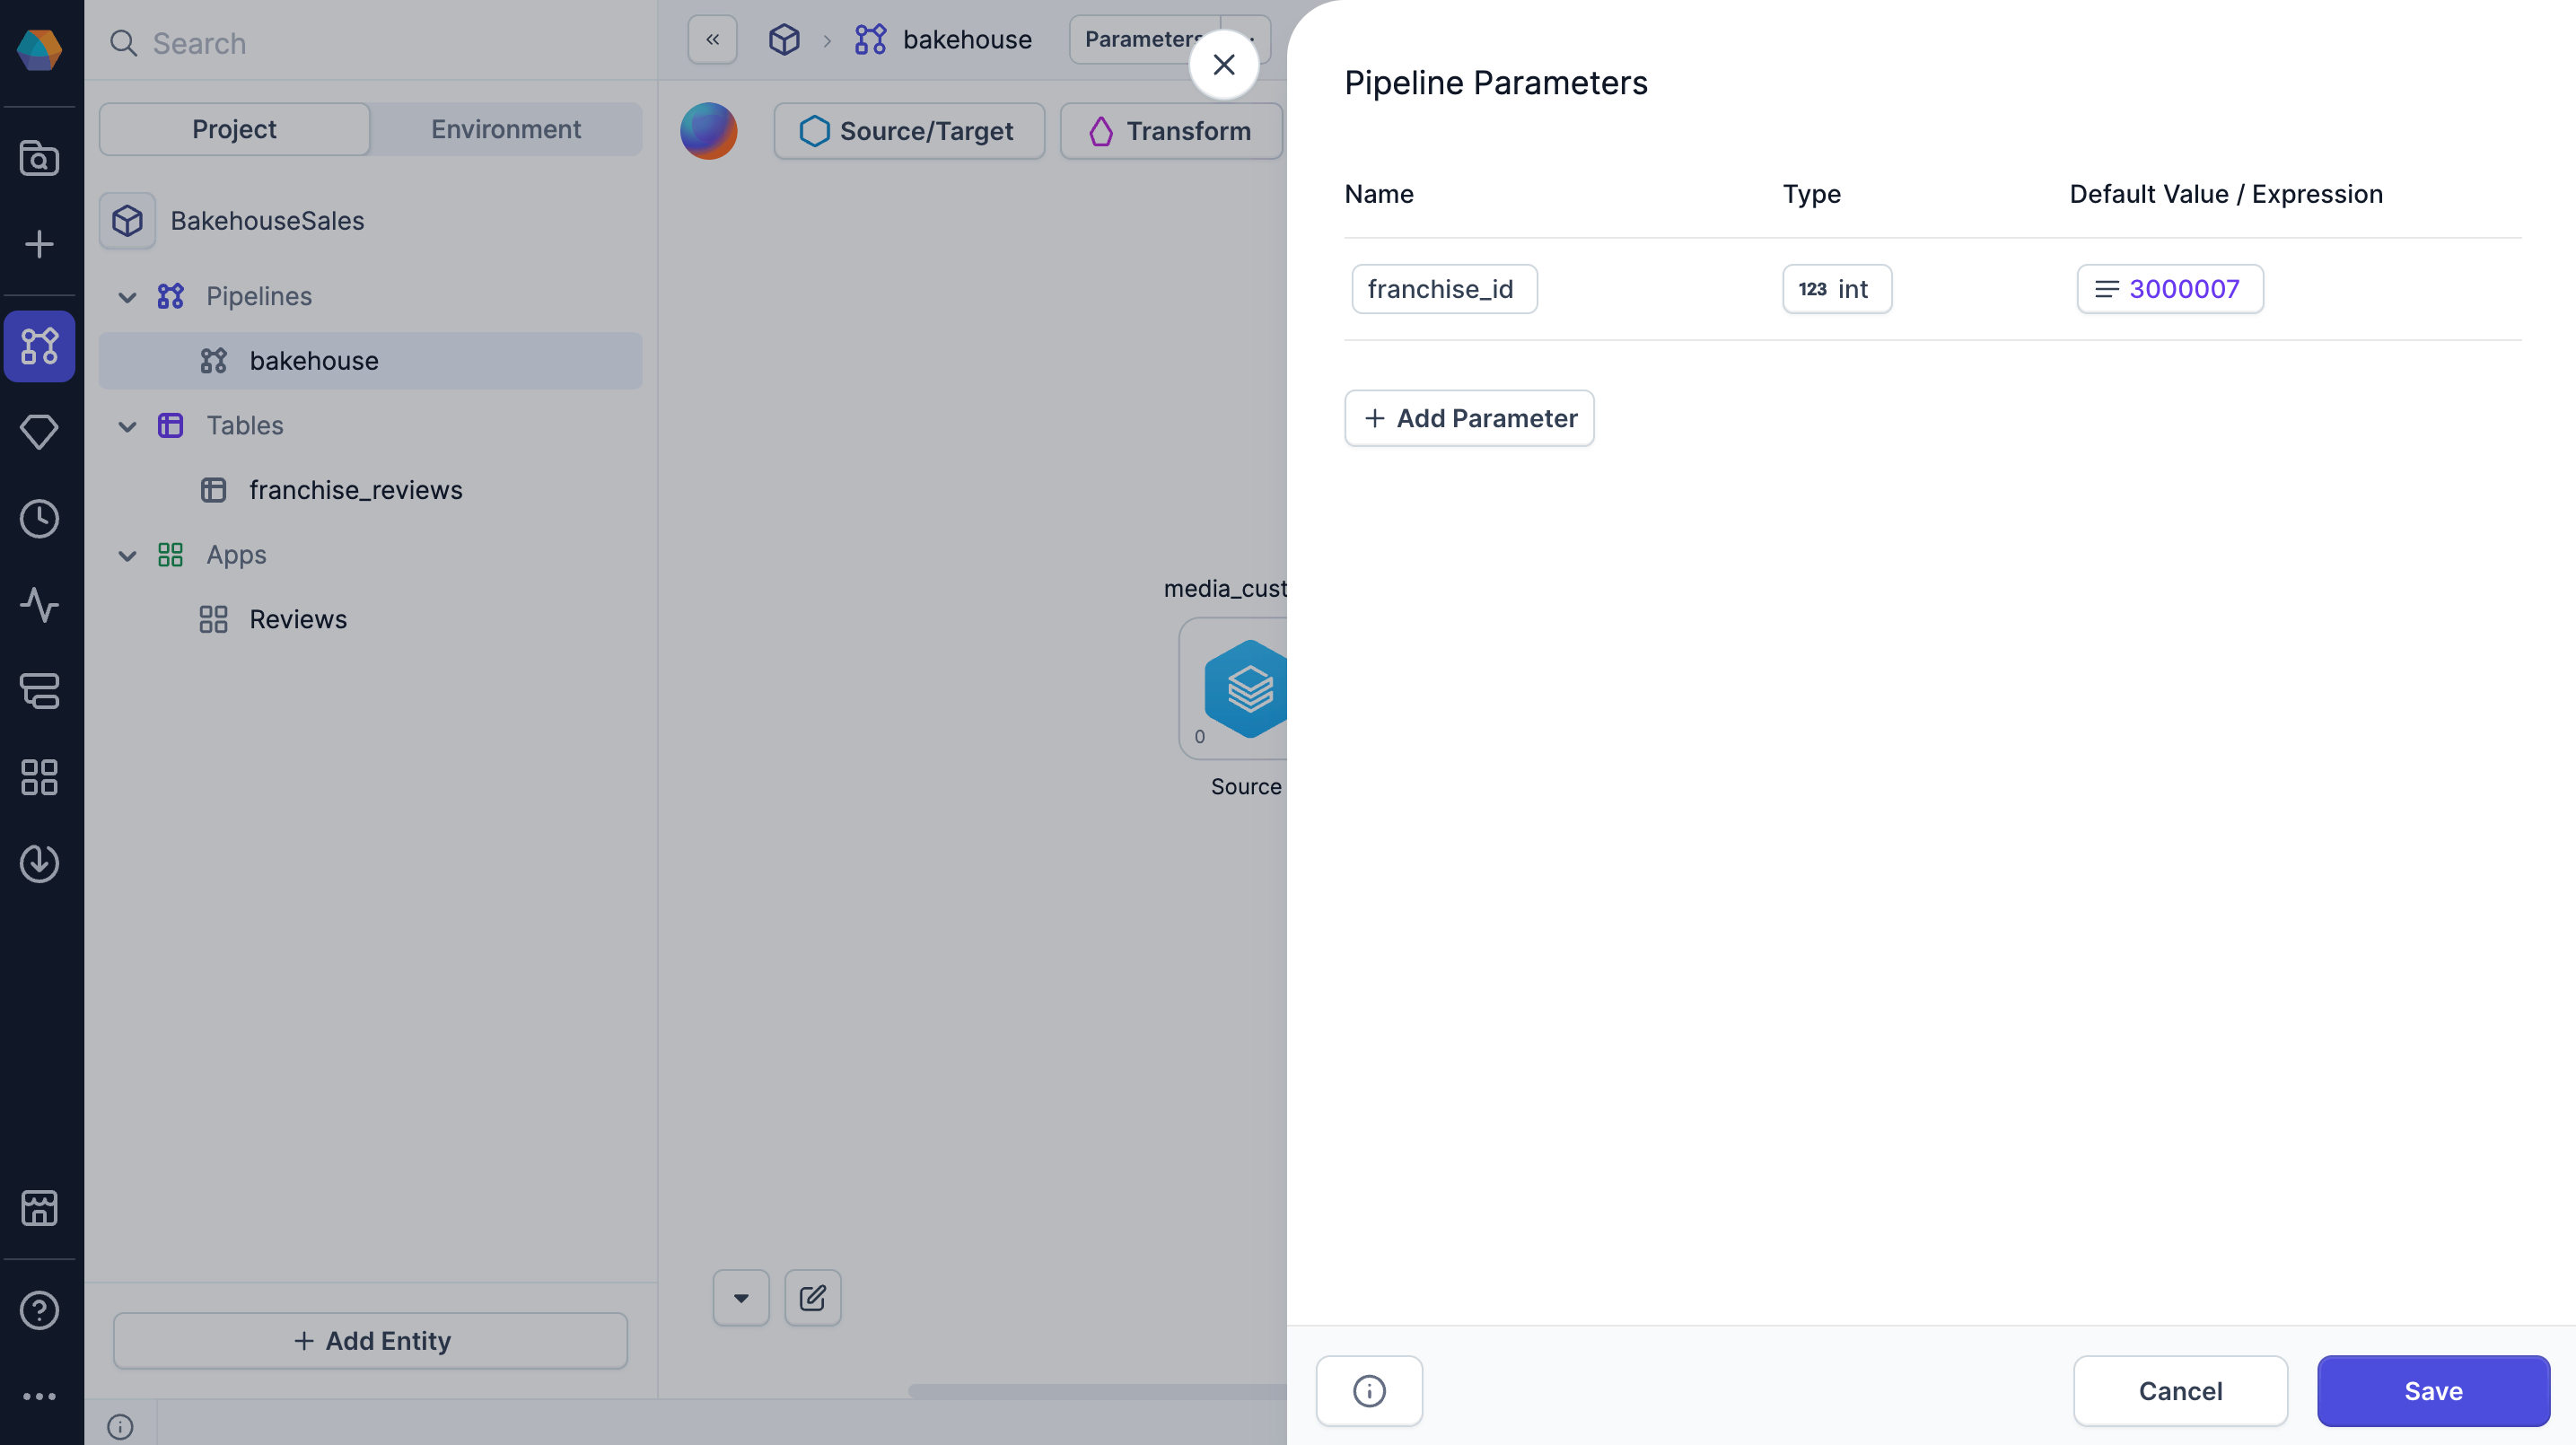
You can choose a new default value when you build the Prophecy App. This overrides the default value assigned in the pipeline parameter settings.
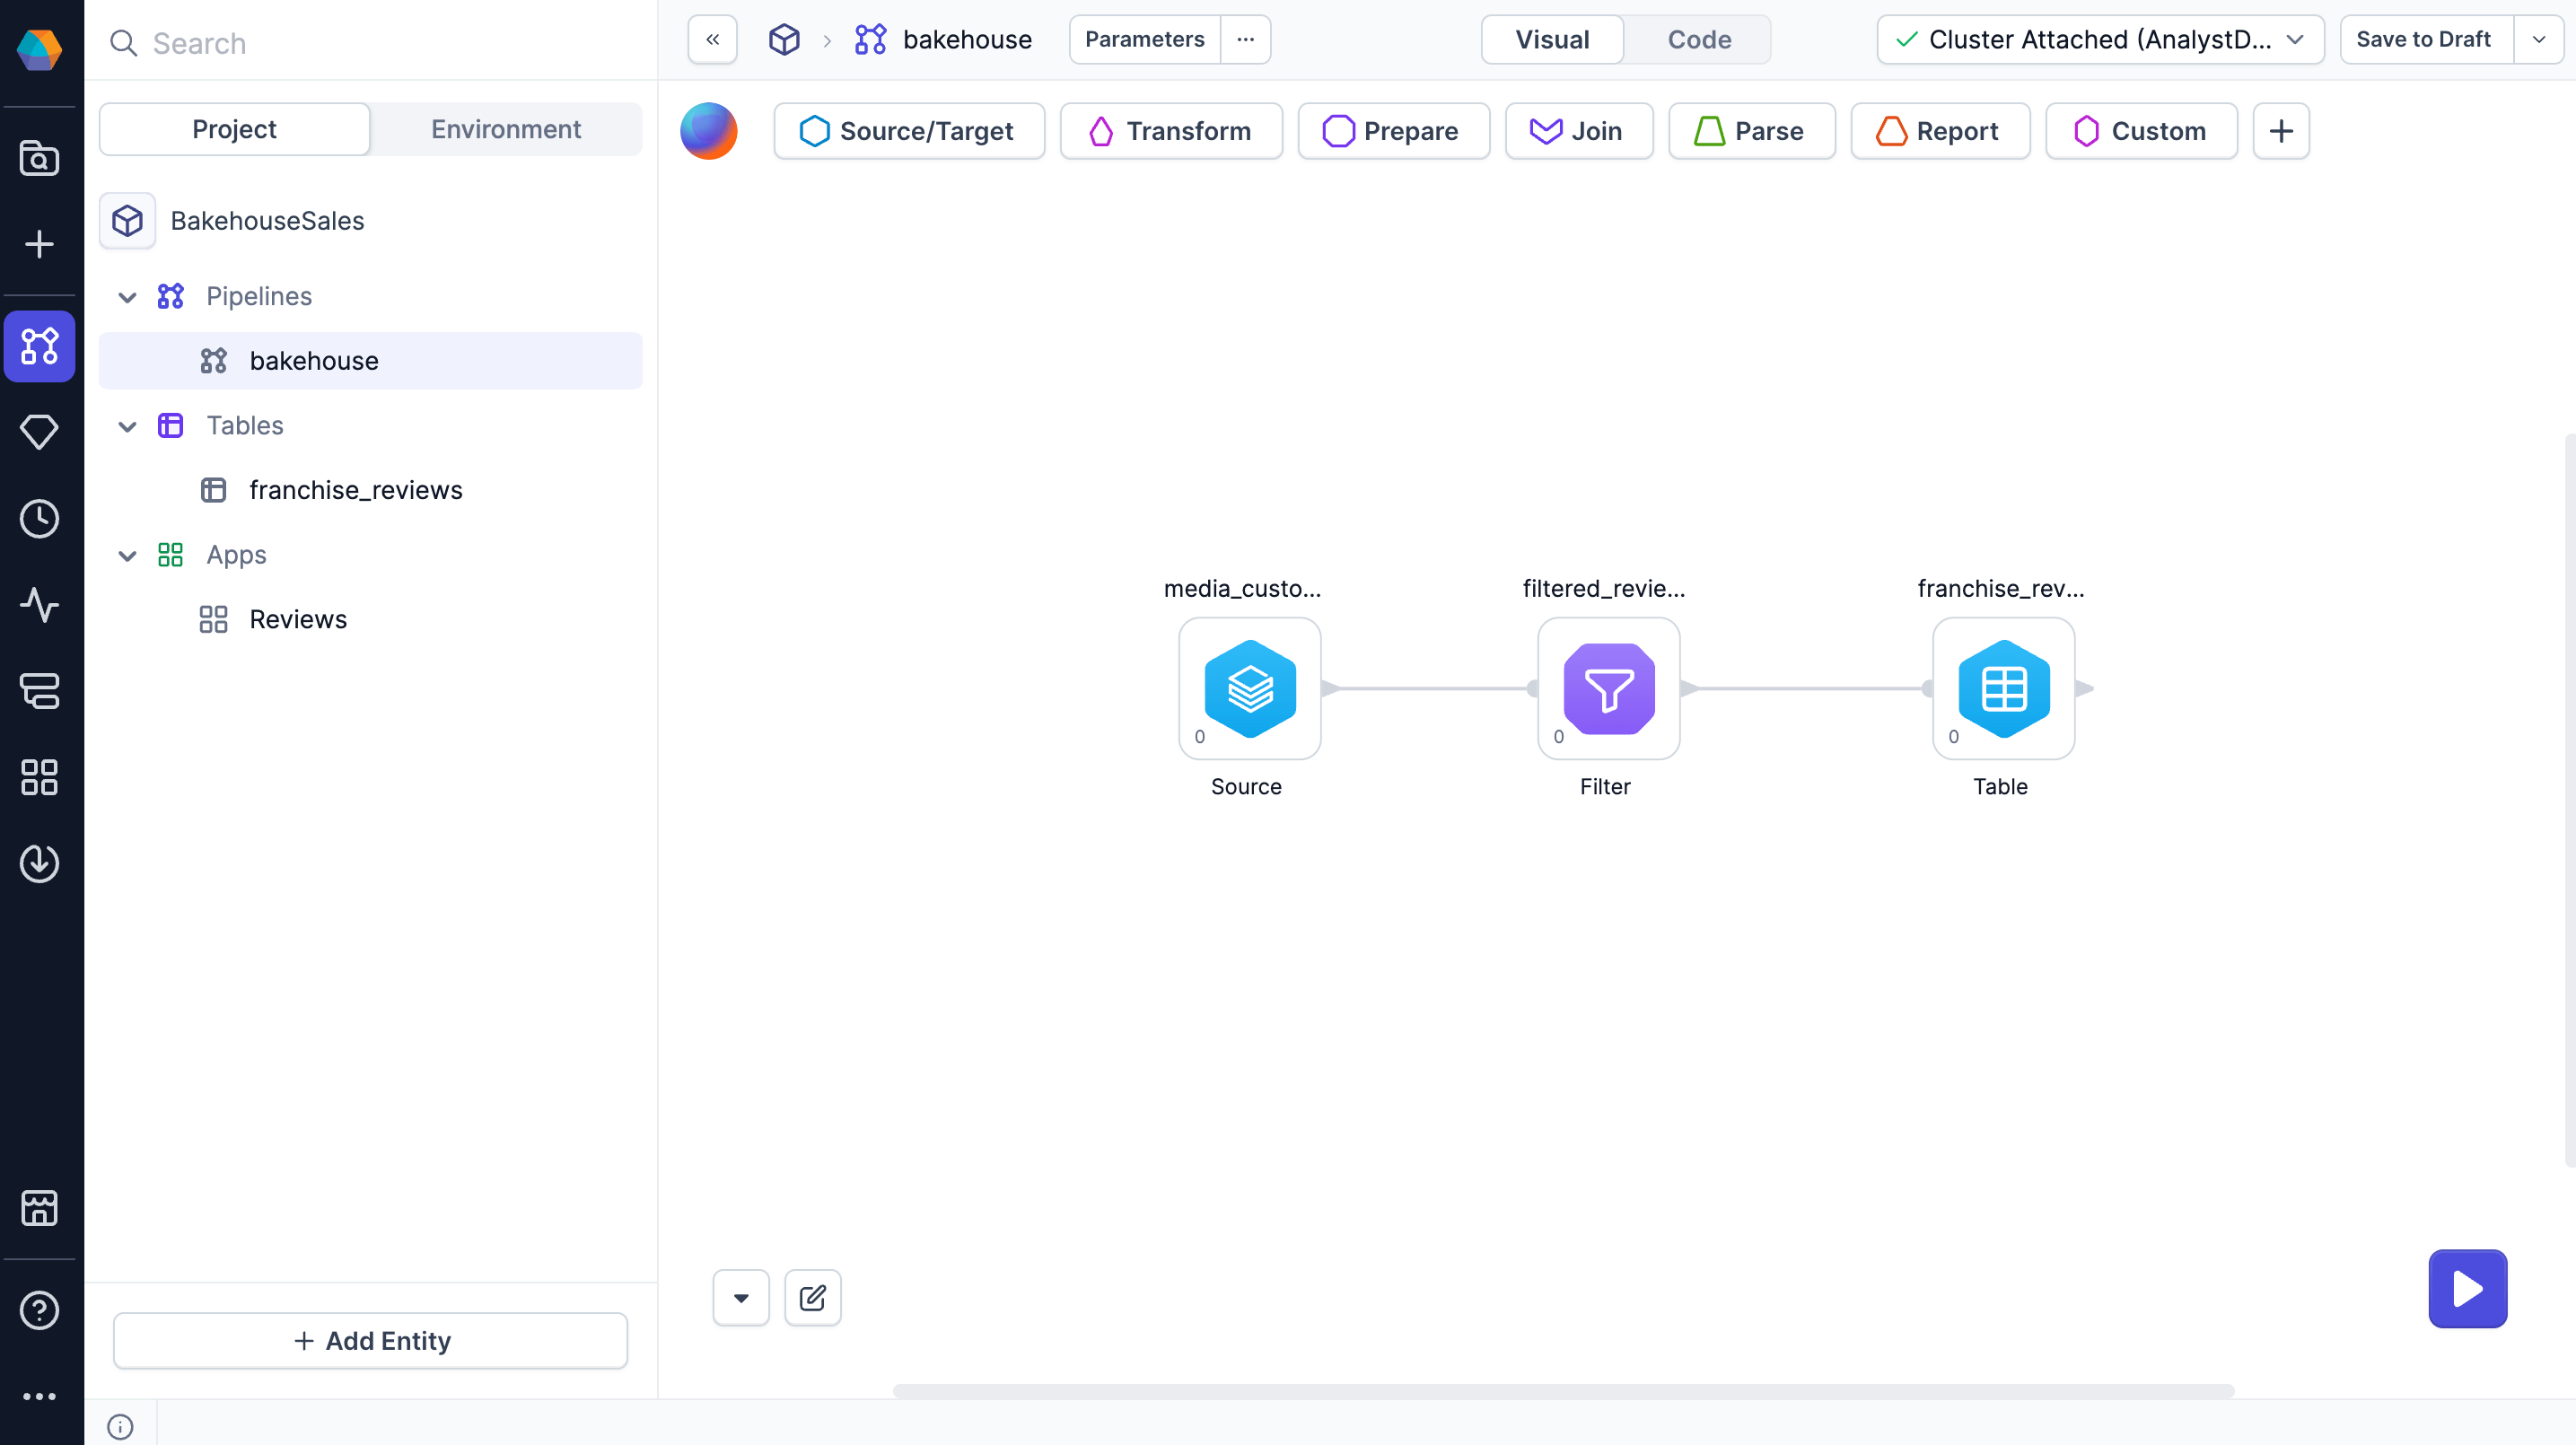
Add source data
Add a Source gem to your pipeline. The Prophecy App will use this source by default unless the user overrides it with their own data in the app.
- Open the Environment browser in the left sidebar.
- Expand the Databricks connection to view your catalogs.
- Open the samples > bakehouse directory.
- Add the
media_customer_reviewstable to your canvas.
Add a filter
Next, add a Filter gem to the pipeline. To make the filter condition dynamic, you'll use the pipeline parameter in the gem.
- Add a Filter gem to the canvas.
- Connect the output of the Source gem to the input of the Filter gem.
- Open the Filter gem configuration.
- For the filter condition, build the visual expression to filter the dataset using values from the
franchiseIDcolumn.
Find your configured pipeline parameters by clicking on the Configuration Variable in the visual expression builder.
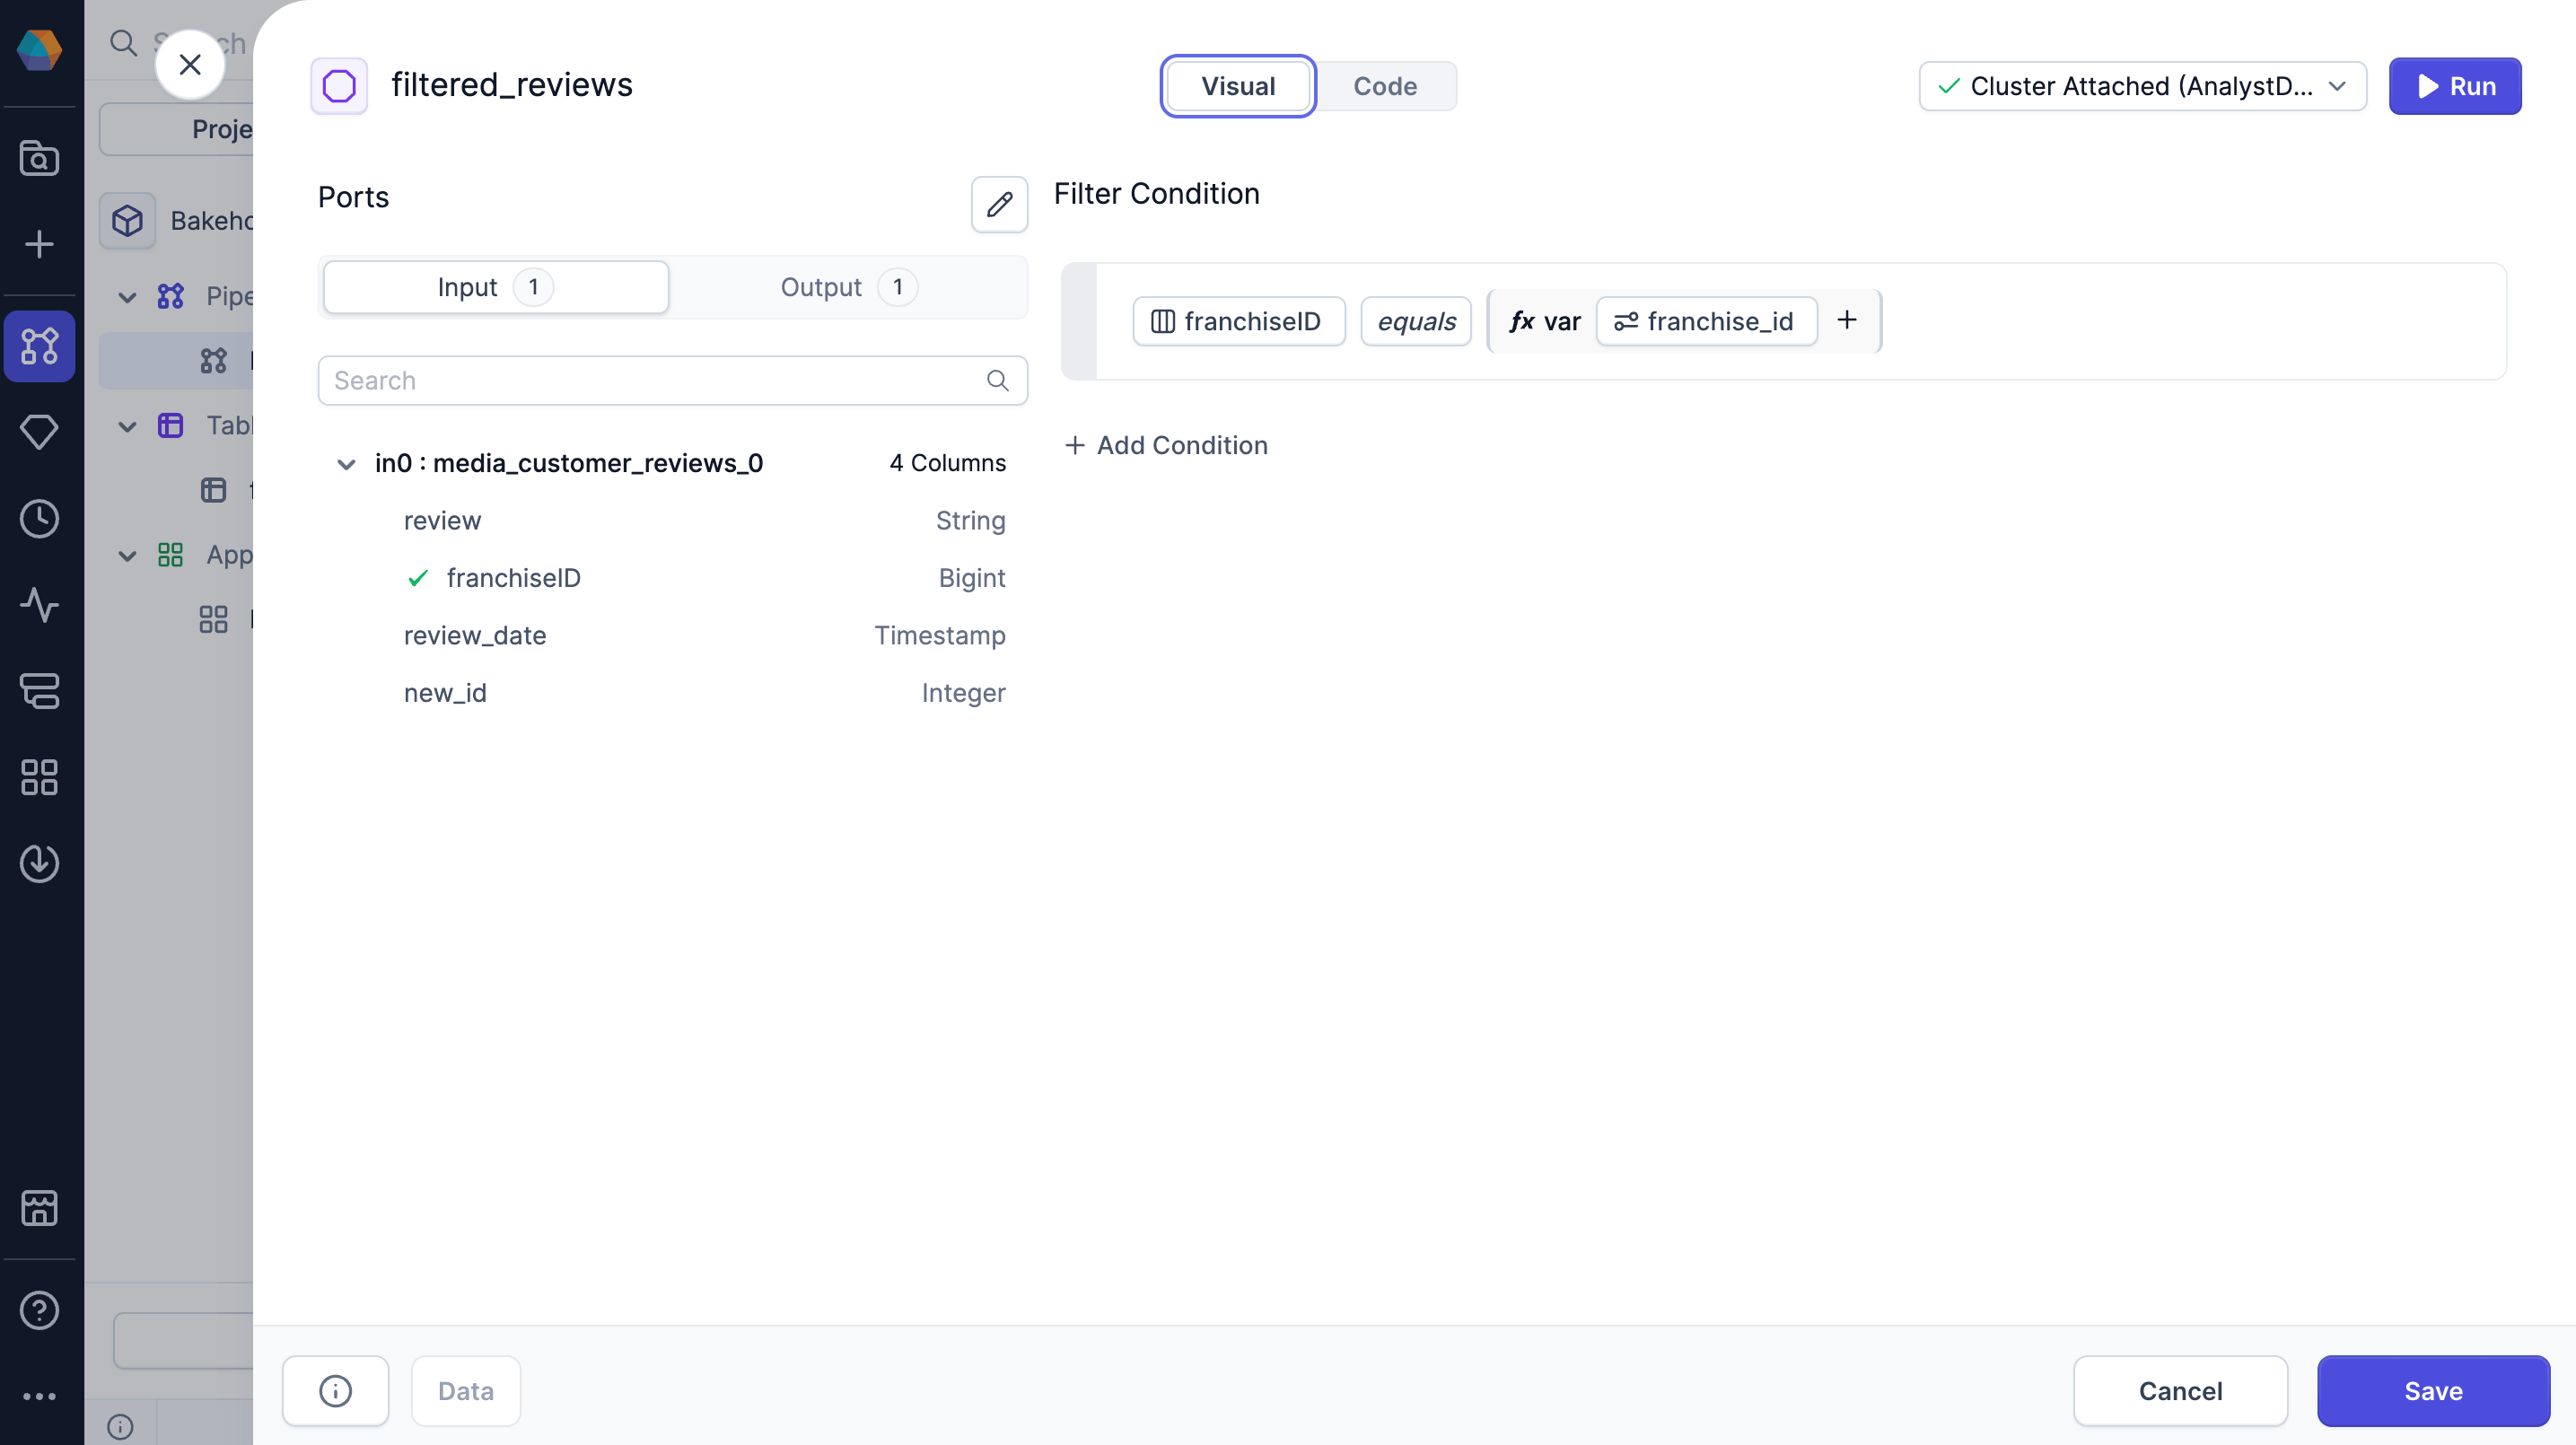
If you switch to the code view, you can use the following expression as the filter condition franchiseID = {{ var('franchise_id') }}.
Add a target table
To add a Data Preview component to your Prophecy App, you need to have a target table in the pipeline. Let's create a table to store the filtered results that users will generate in the app.
- Open the Source/Target gem category.
- Click Table to add a new table to the canvas.
- Connect the output of the Filter gem to the input of the Table gem.
- Open the Table gem configuration.
- Under Select Type and Format, select Table.
- In the Location tab, assign a location where Prophecy will write the table.
- Review the remaining tabs and keep the default settings.
- Save the gem.
Create a new Prophecy App
After you build the pipeline, create a Prophecy App to run it. Apps are created directly within projects as project components.
- In the project browser, hover over Apps and click the + icon.
- Name the app
Reviews. - Add the description
Filter bakehouse reviews by franchise. - Select the pipeline you just created for the app to run on.
- Define where the app code will be stored. The default
appsdirectory is sufficient. - Click Create App to open the App Builder.
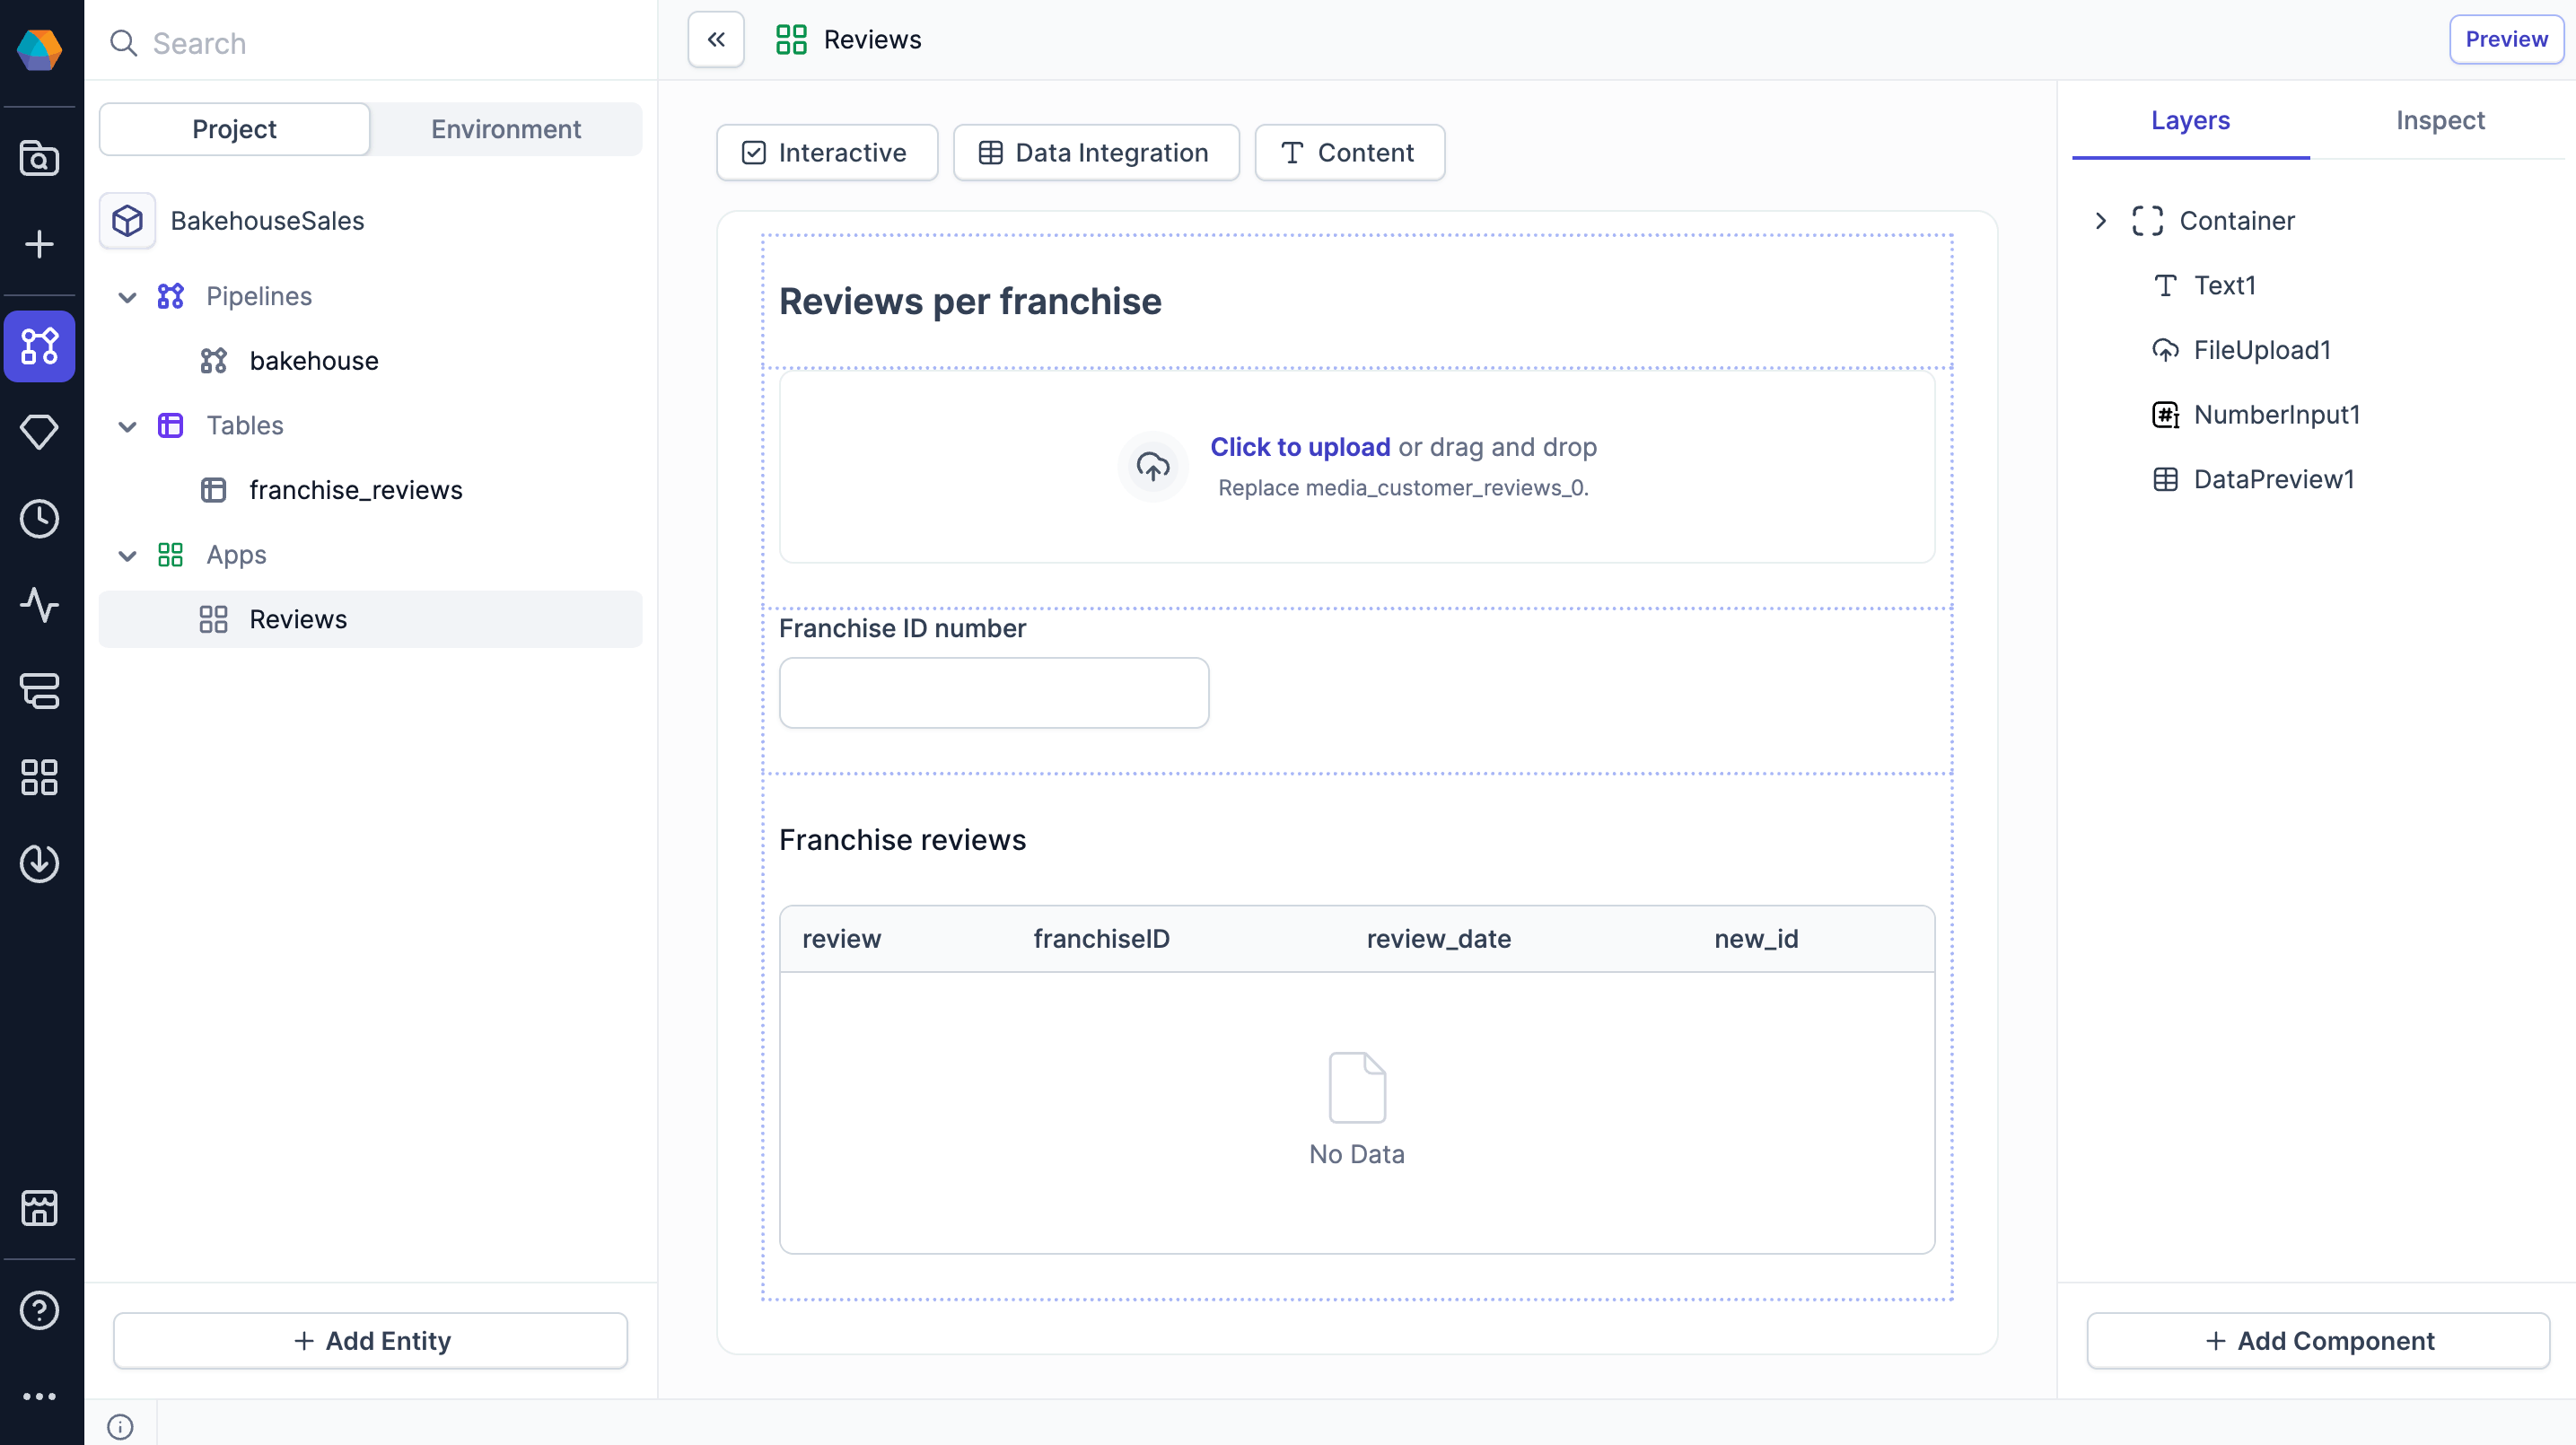
Add a Text component
First, add the Text component that serves as the page title and helps users understand the purpose of the app.
- Open the Content dropdown and select Text.
- In the Inspect tab of the right sidebar, enter
Filter Bakehouse Reviewsas the component text. - Choose Heading 1 as the text format.
Add a File Upload component
Then, add a File Upload component where users can upload their data. This provides flexibility by allowing users to work with their datasets rather than being limited to the default source.
- Open the Data Integration dropdown and select File Upload.
- In the Inspect tab, for the Source component, choose the Source gem that the uploaded data will override.
If no file is uploaded, the pipeline uses the default source data configured in the Source gem.
Add a Number Input component
Next, add a Number Input component to let the user input how to filter the data. This component will control the value of the pipeline parameter you created earlier.
- Open the Interactive dropdown and select Number Input.
- In the Inspect tab, for the Configuration field, select
franchise_id. This is the pipeline parameter. - For the Label, enter
Franchise ID number.
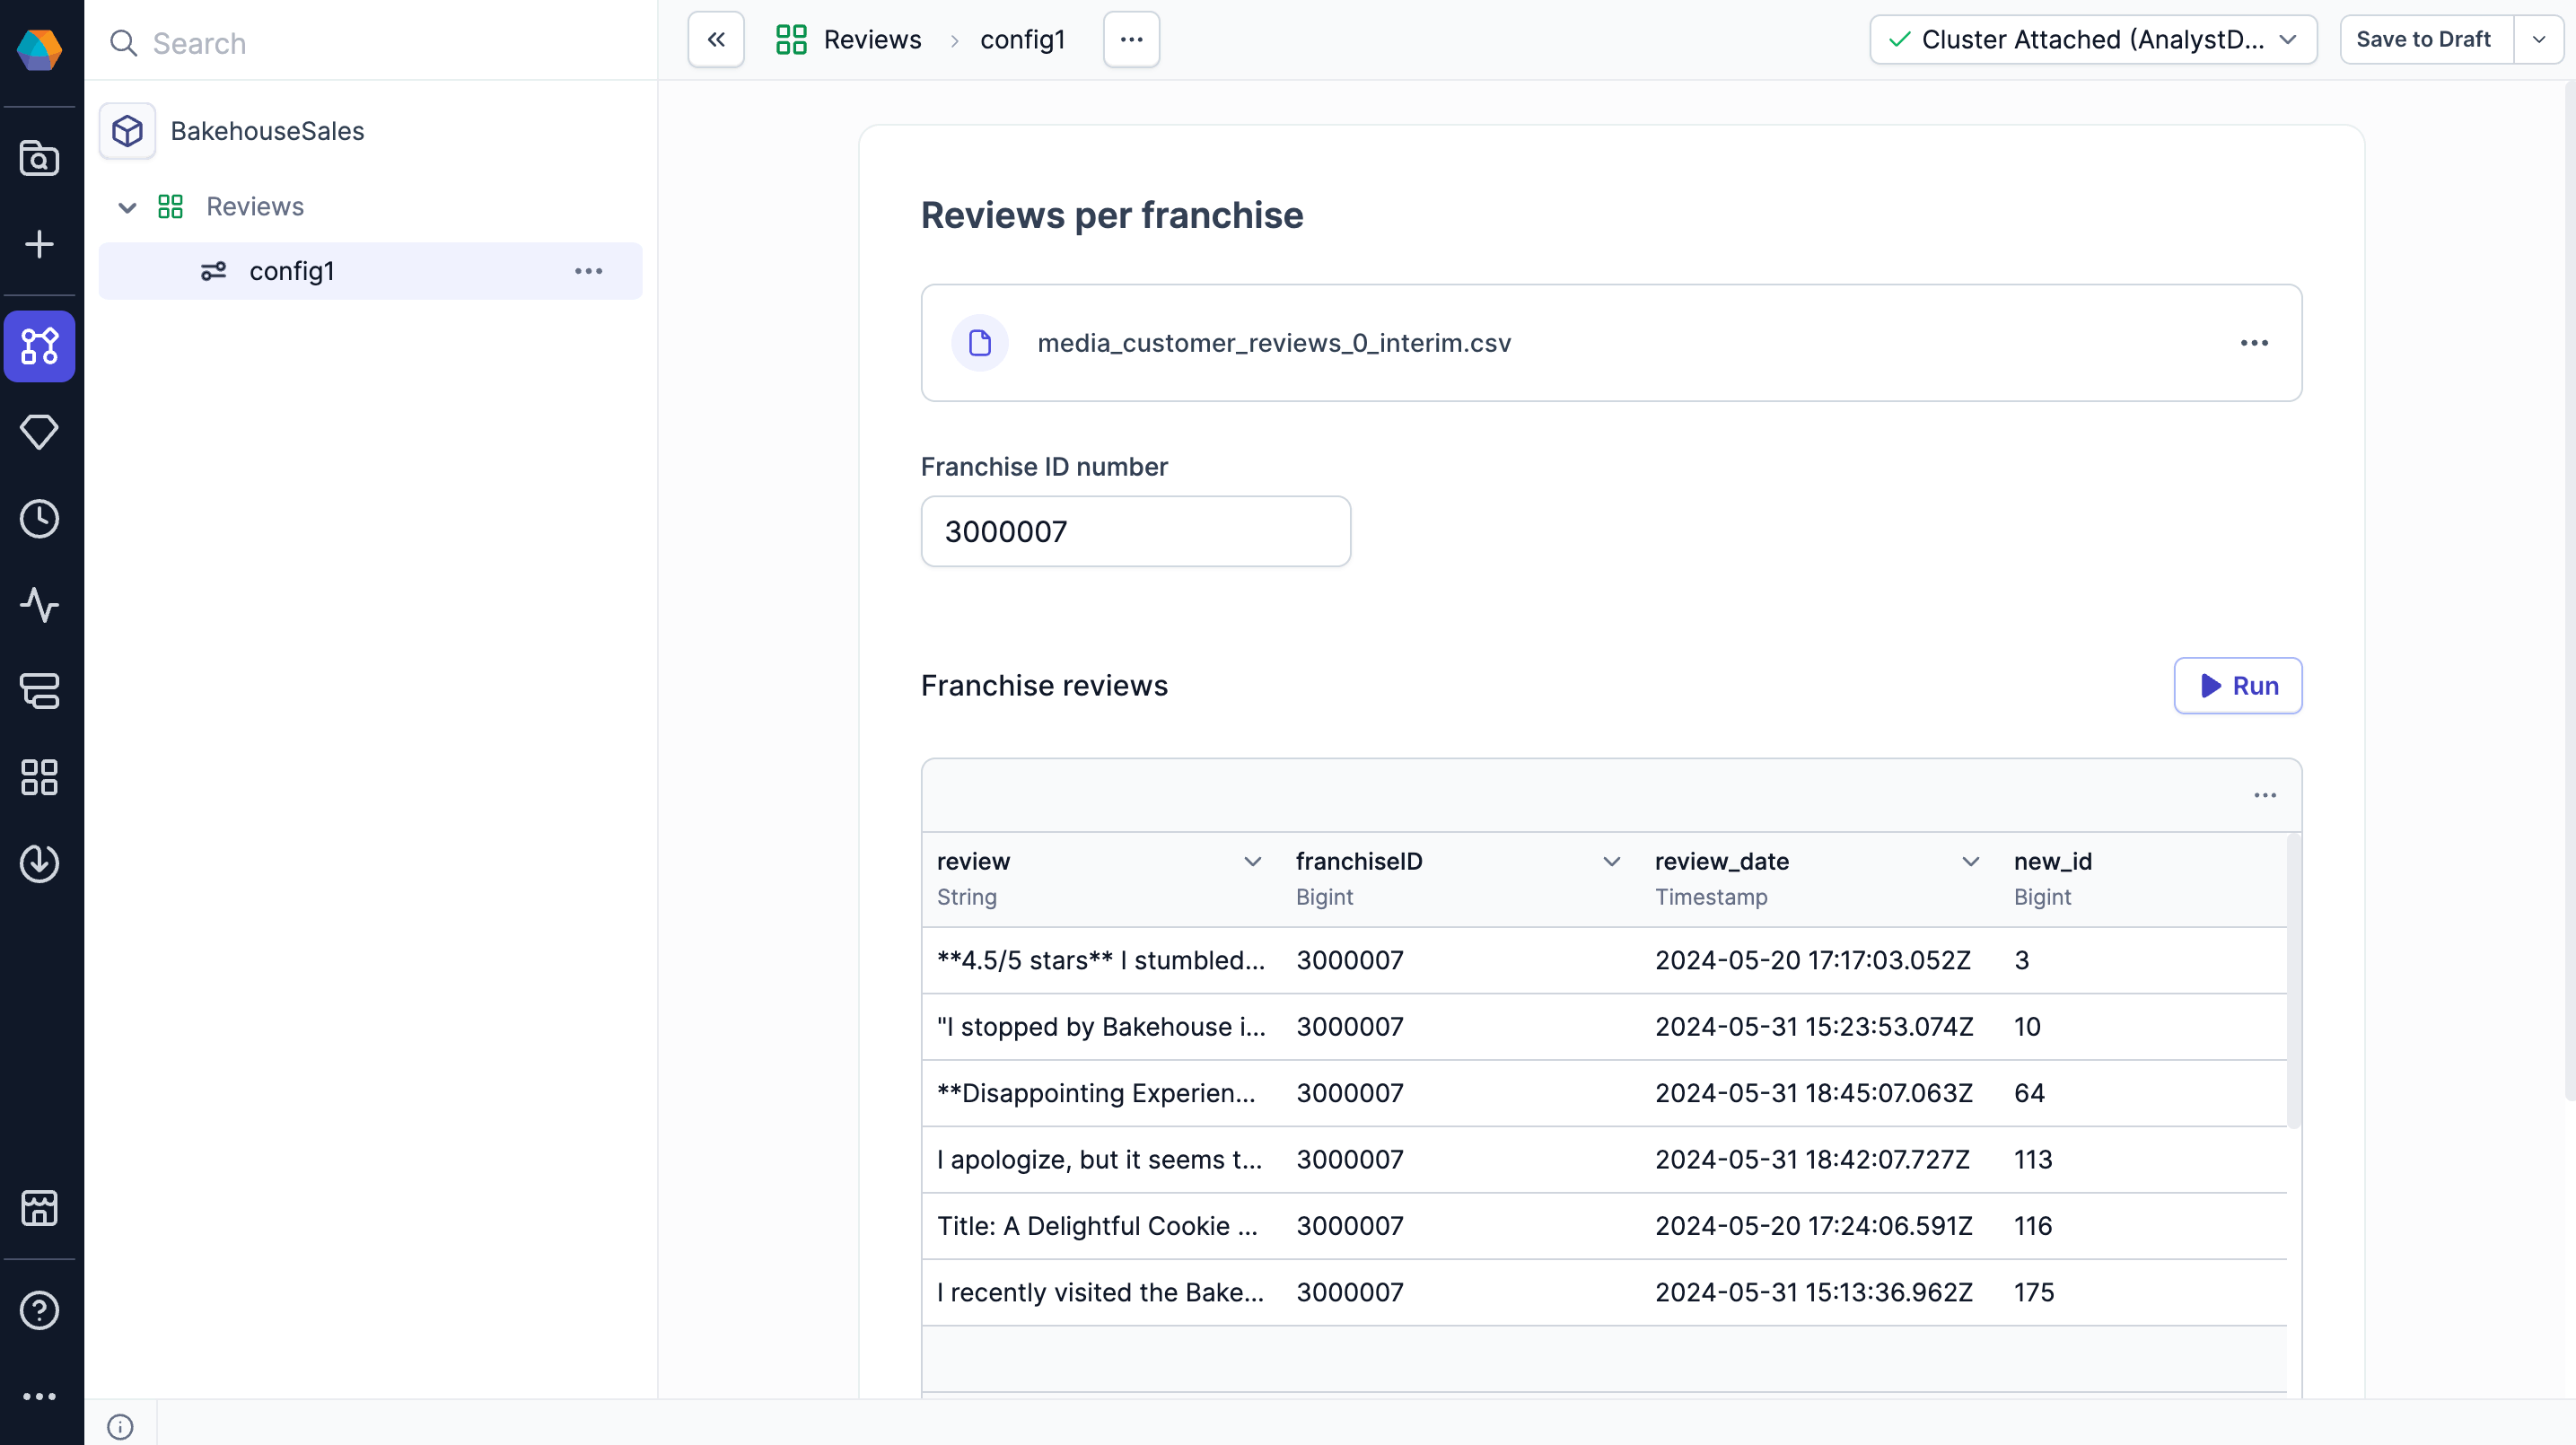
Add a Data Preview component
Finally, add a Data Preview component to display a sample of the result of the pipeline execution. This allows users who run the Prophecy App to view and download the output data.
- Open the Data Integration dropdown and select Data Preview.
- In the Inspect tab, select the pipeline's output table.
- For the Label, enter
Franchise reviews.
The following image shows the complete Prophecy App template in the App Builder.
Run the app
After building the app, execute it to validate its functionality. This process allows you to verify that all app components function according to specifications.
- Navigate to the App Browser using the left navigation menu.
- Review the apps associated with projects owned by your teams.
- Select your Review app.
- Create a new app configuration. This configuration represents an instance of the app with a set of custom parameter values.
- Test the app by uploading various datasets and running the app to observe results.
To explore advanced configuration options and scheduling capabilities, refer to the documentation on running apps.
When you run a Prophecy App, the entire underlying pipeline is executed—not just the components visible in the app. This means any additional transformations, tables, or other components included in the pipeline will also run, even if they’re not exposed in the app interface. Be mindful of how you design the pipeline to ensure app users only trigger the intended logic.
What's next
To address your specific business requirements, leverage more complex components to construct robust Prophecy Apps.